
Jayco Seneca & Entegra Accolade Super C: Coach Separation Problems and Fixes
If you own a Jayco Seneca or Entegra Accolade Super C RV (or are thinking of purchasing one), you will probably want to read or watch this!
Let me start off by saying that we love our 2022 Entegra Accolade XL 37L. We call her BIG LADY (she’s an AccoLADE XL, get it?). She’s a big, bad-ass, tough-lookin’ gal.
Even though BIG LADY looks tough, we do pamper her. For example, we don’t camp in remote places with bad roads -- although truthfully, some highways feel like we are off-roading (Nebraska, Arizona, I’m talking to you!). We never raise our wheels of the ground when leveling. We aren’t overweight (I’m talking about the rig; we could both stand to lose a few pounds😊). We do regular maintenance on BIG LADY as well.
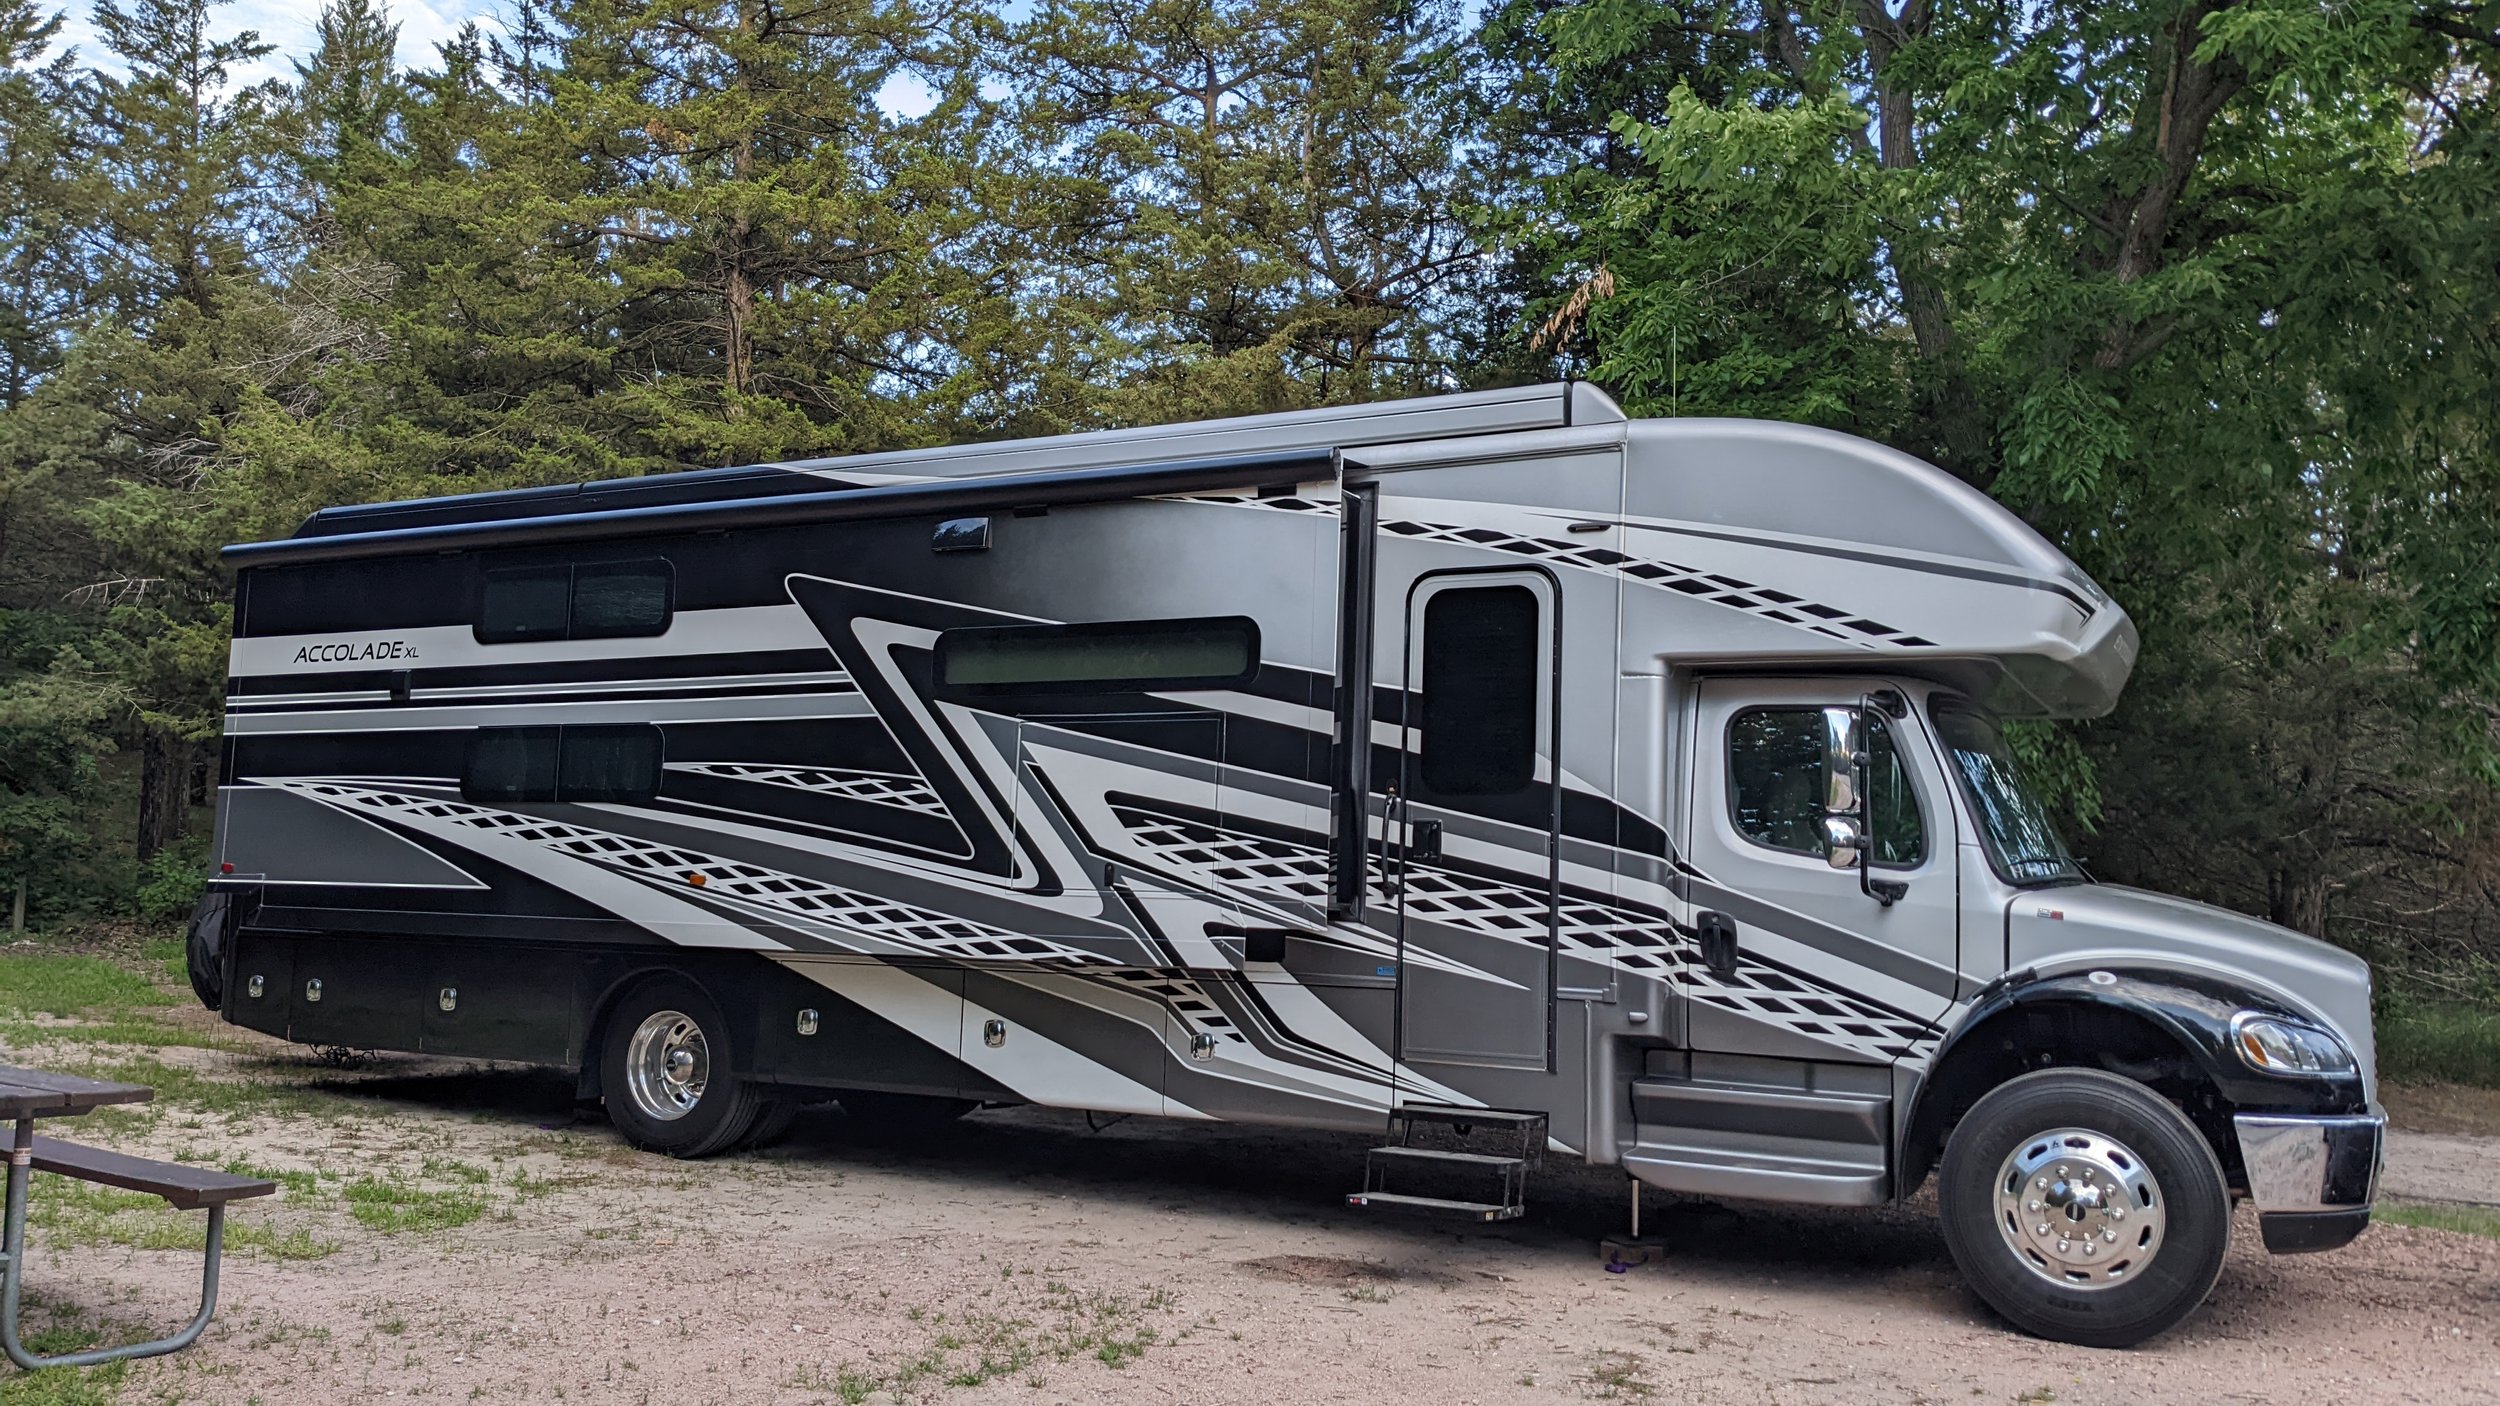
BIG LADY (our 2022 Entegra Accolade XL 37L) at the Bessey National Forrest in Nebraska
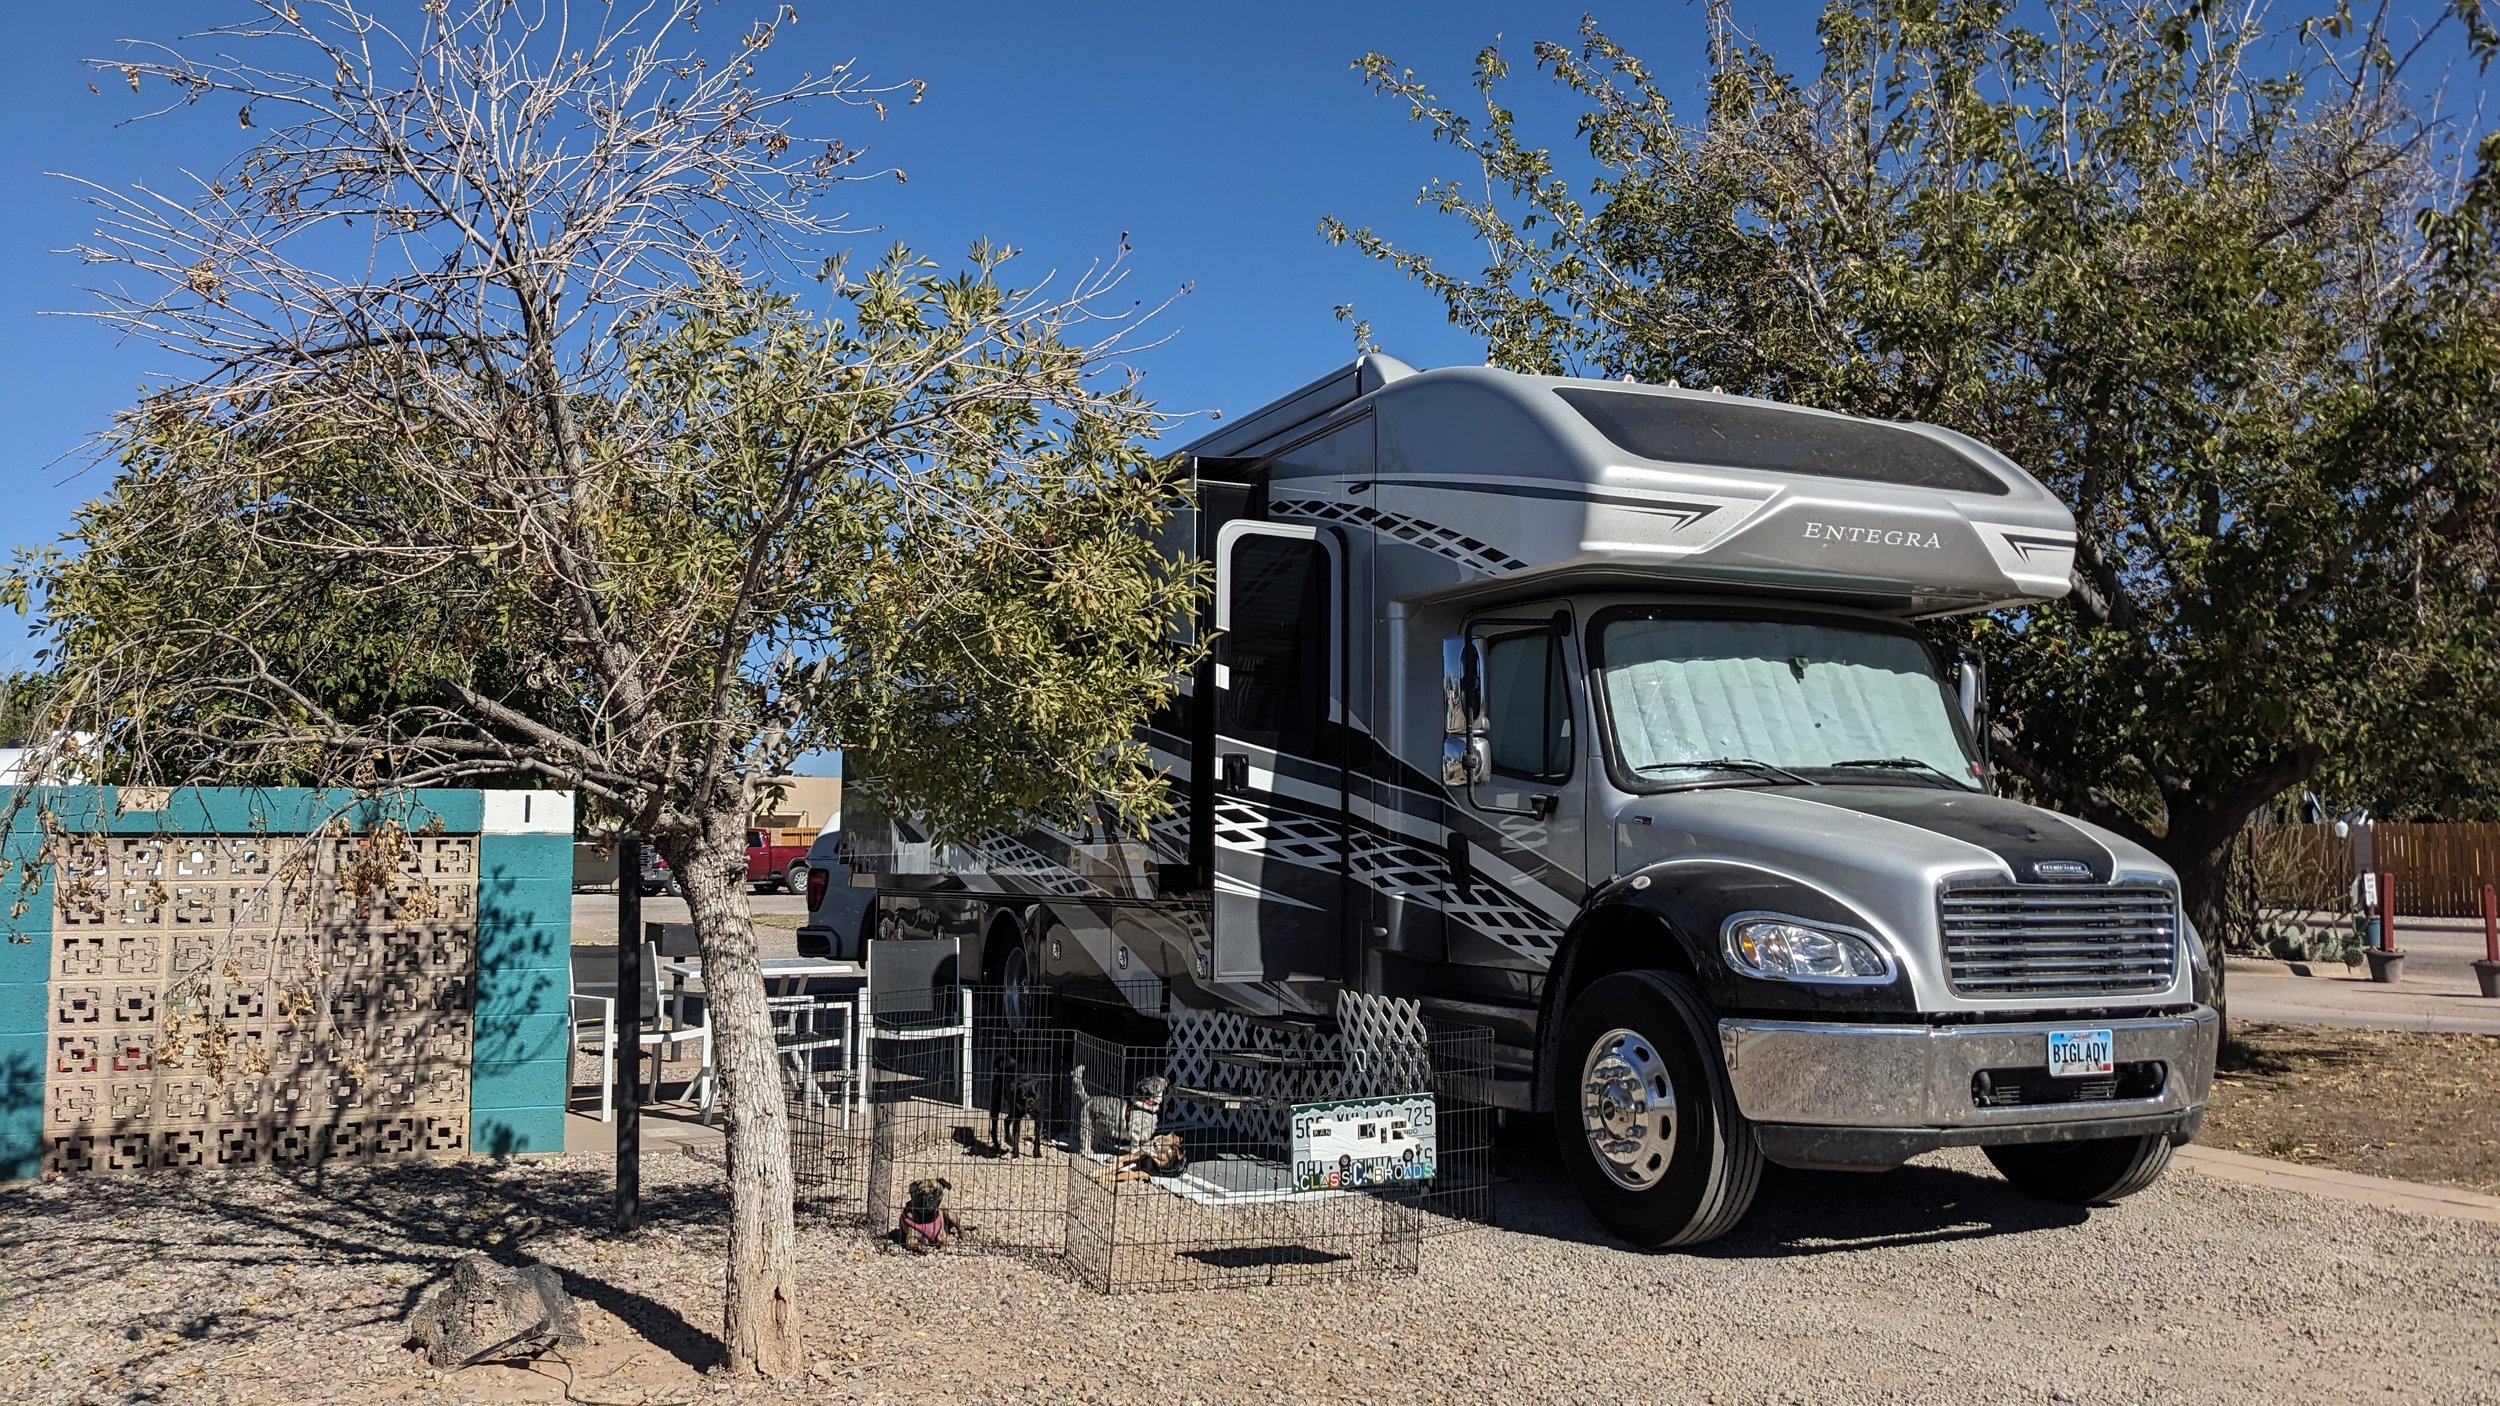
BIG LADY (our 2022 Entegra Accolade XL 37L) in Alamogordo, NM
While we’ve had some issues with BIG LADY, they’ve all been manageable (knock on wood). For minor issues, we fix those ourselves. For more complicated issues, they fortunately have not required urgent attention, and so we’ve traveled to the Entegra manufacturing facility in Middlebury, Indiana for warranty work. For the most part, the company has been good to work with. RVs are not perfect, and people aren’t perfect. Based on our personal experience with BIG LADY, we repeatedly tell ourselves that if we had to buy another Super C, we would probably pick the same one.
In short, we’ve been pretty lucky with BIG LADY. Unfortunately, other owners of Entegra Accolades haven’t been. The Jayco Seneca and Entegra Accolade Super Cs seem to repeatedly suffer from coach separation issues — namely, the Wing Wall problem and the Vertical Seam Separation problem. Frankly, that scares me. I wanted to better understand what to look out for and how to fix such issues so I started doing some research. That lead to this blog.
Here’s what I’ll cover:
Special thanks to Brian Miller, Robert Ross, Don McPhail, Tim Barrett, Jim Stewart, Mark Silverman, Dave Poole, Justin Mix, Jeff Glowniak, and others for their help information and photos/videos.
Jayco Seneca vs. Entegra Accolade
The title of this blog is about the Jayco Seneca and Entegra Accolade Super C. Perhaps we should back up a bit and start with whether there are any differences between a Jayco Seneca and an Entegra Accolade.
Is there a Difference between a Jayco Seneca & Entegra Accolade Super C?

BIG LADY is nestled between some Jayco Senecas and Entegra Accolades at the inaugural Super C rally (fall 2023)
Short Answer: Not Really. Jayco Senecas and Entegra Accolade are basically the EXACT same RVs – just a different brand.
In fact, both brands say “Jayco” as the manufacturer on the RV title. For a given model, the MSRP is the same. The floor plans are the same.
Why are the brands basically the same? Entegra has been owned by Jayco since 2008. In 2016, Thor Industries acquired Jayco, and that sale included the Entegra coach lines.
The Jayco Seneca has been around for a couple of decades. From 2005-2011, the Seneca was manufactured on a Chevy Kodiak chassis. Starting in 2012, Jayco switched to the M2 Freightliner chassis, and then in 2018, Jayco began manufacturing the Seneca on a Freightliner S2RV chassis. Entegra launched the Accolade in 2020 on the S2RV.
Since 2021, both Jayco and Entegra allow buyers to purchase an upgraded model. Jayco calls their upgraded model the Seneca Prestige, while Entegra has named their model the Accolade XL. One important difference between the base model and the upgrade model is the factory lines where the units are made. Both are made at the Jayco manufacturing plant in Middlebury, Indiana. The upgraded Prestige/XL models are manufactured in the same building as the expensive Entegra Class A diesel pushers— reportedly because they all contain tile flooring. In contrast, the base models are made in the same building with other Jayco motorized units, including the Jayco Greyhawk. Put another way, the Prestige/XL models made on the same line as $500K-$800K RVs whereas the base model Accolades/Senecas are likely the most expensive rigs in their plant.
So, what is the difference between a Jayco Seneca (whether the base model or the Prestige) and an Entegra Accolade (whether the base model or the XL)?
The main differences between Senecas and the Accolades are the exterior paint schemes and the interior designs. The only reason that we picked and Accolade over the Seneca is that we liked the color schemes of the Accolade marginally better. We also THOUGHT (at the time of purchase) that Entegra offered a more robust structural warranty based on the language in the 2022 Entegra Accolade Owner’s Manual. More on that below….
Overview of Two Major Super C Coach Separation Issues
Many Jayco Senecas and Entegra Accolades have suffered from structural issues regarding the way that the font cab and front corner walls are connected to the rest of the coach. These generally manifest themselves in two ways:
The “Wing Wall” problem
The Wing Wall problem generally refers to “excessive flexing, squeaking, or cracking at the transition between the cab and house” of the RV.
The “Vertical Seam Separation” problem
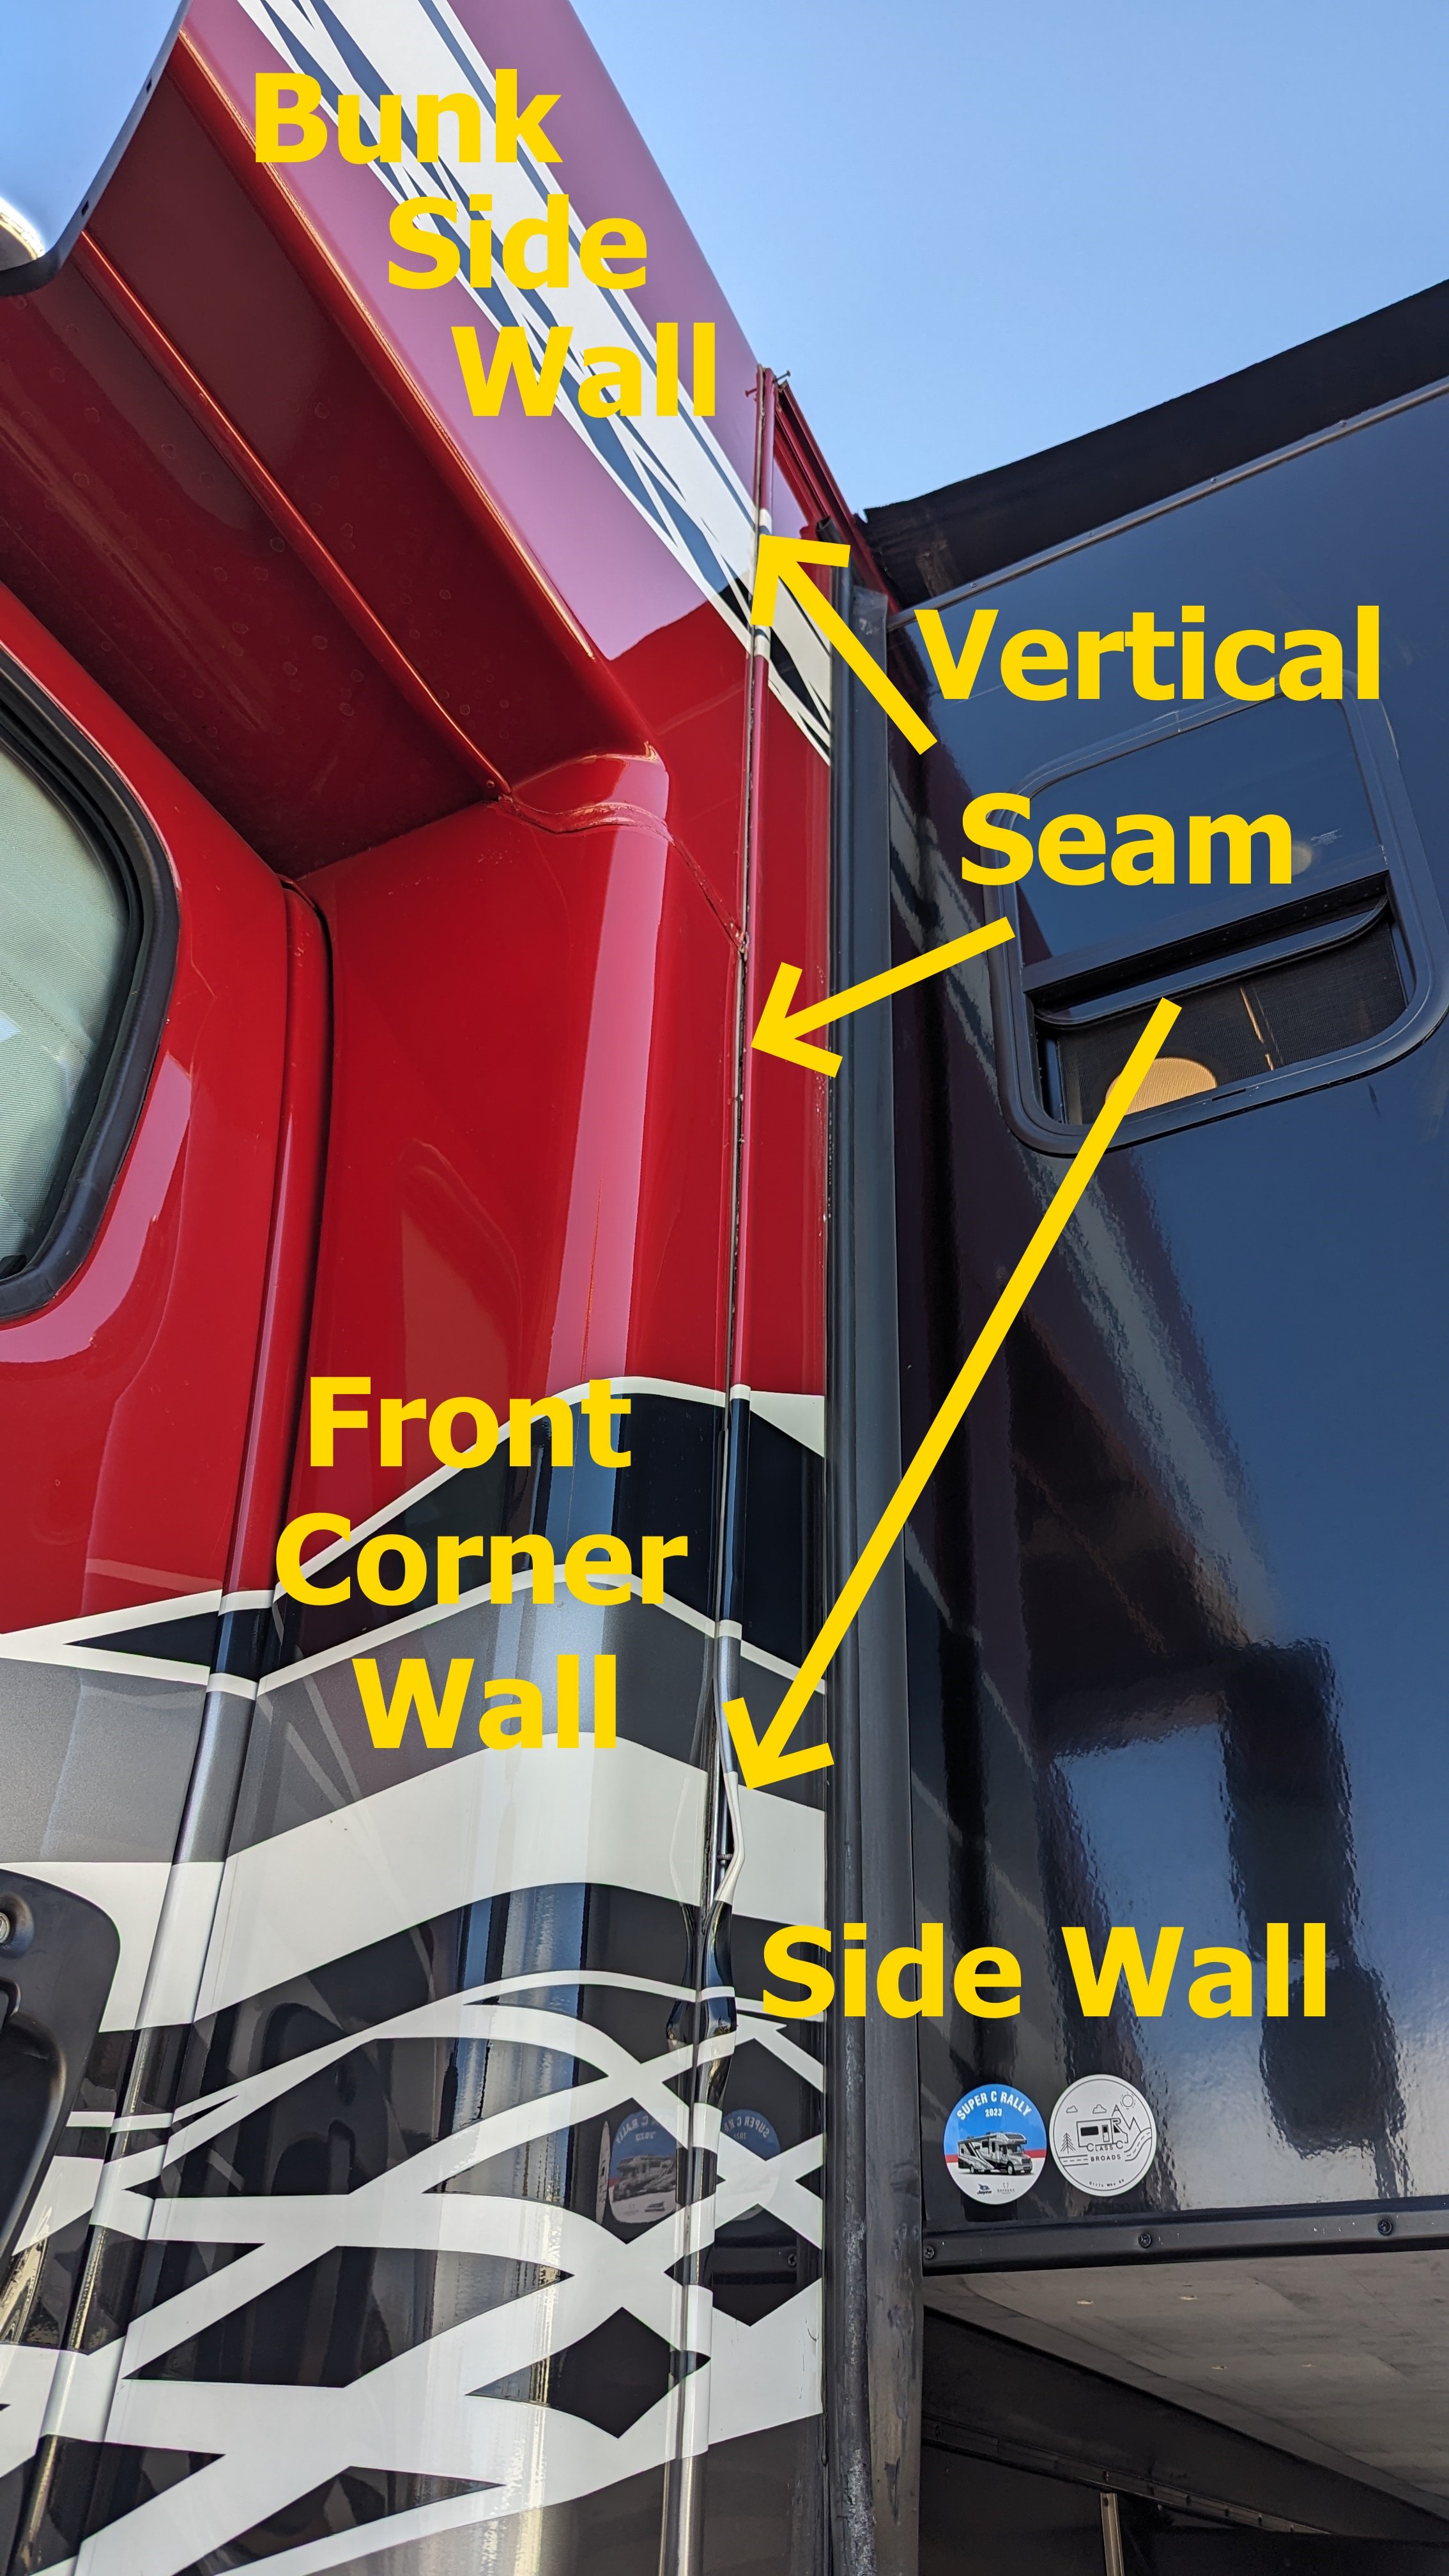
Each side of the Jayco Seneca and Entegra Accolade has a vertical seam that connects the house side wall to (1) an over-the-cab bunk fiberglass side wall and (2) a lower front fiberglass corner wall near the cab. The Vertical Seam problem occurs when the screws in the seam back out and the vertical seam starts to separate.
An RV may suffer from one or both of these problems, and it is possible that one problem may exacerbate the other. Moreover, these problems are what I would call “latent defects” insofar there is a structural design problem, but a purchaser of a Seneca of Accolade wouldn’t know about the problem by inspecting the rig.
We belong to several Facebook groups where these problems are often discussed. (If you own a Jayco Seneca or Entegra Accolade or are thinking about purchasing one, we’d recommend you join these groups).
Accolade group: https://www.facebook.com/groups/499457587362822
Seneca group: https://www.facebook.com/groups/451588071907676
Accolade/Seneca combo: https://www.facebook.com/groups/1266223780192936
Posts on social media platforms sometimes confuse these two issues and how to best fix them. I therefore wanted to try to summarize the issues and proposed fixes in a single easy-to-understand document.
Disclaimer: Please note that WE ARE NOT RV EXPERTS! WE ARE JUST TRYING TO SHARE WHAT WE HAVE LEARNED FROM OTHERS. DO YOUR OWN RESEARCH. WE ARE NOT RESPONSIBLE FOR YOUR RIG. We do get a very small commission at no cost to you if you use one of the Amazon Links (a/k/a beer money).
What is the Wing Wall Problem on a Jayco Seneca and Entegra Accolade Super C?
Perhaps we should start with “What is a Wing Wall?”
Short Answer: Depends on Who You Ask.
What is the Wing Wall on a Super C?
The “Wing Wall” is ostensibly located behind the driver and passenger seats of the RV. From what I can discern, many people use the term “wing wall” to refer to the wooden panels that are underneath a decorative panel on each side of the rig behind the seats. Until 2022, the long and angled wooden panel looked more like a broken bird wing than a wall. Sometime in 2022, the “wing walls” became larger and covered most of the area behind the driver and passenger seats (more on that below).
Old Wing Wall Design (a/k/a the Broken Bird Wing Wall)

The Wing Wall in a older Jayco Seneca. I think it looks like a broken bird wing.
New Wing Wall Design

Wing Wall in the newer Jayco Seneca and Entegra Accolade.
The Wing Wall perhaps more accurately refers to the interface between the cab and the house located (1) behind the driver and passenger seats of the RV and (2) near horseshoe-shaped cut-out area in the overhead bunk. According to Jayco/Entegra, “[e]xcessive flexing, squeaking, or cracking” in that area was generally labeled a “wing wall” problem. Here’s a video that might give you an idea of what things look and sound like.
How is the Wing Wall Problem Fixed?
Jayco/Entegra SRP Bulletin 22-062
For many years, there wasn’t a uniform solution to the Wing Wall problem. One RV owner who saw daylight in the wing-wall area the RV to the dealer, only to have the dealer just fill in the cracks and gaps with foam. Other RVers tore apart their rig and through-bolted the cab to the house to better secure them together.
Sometime in 2022, Jayco/Entegra began installing a “wing wall” fix to new RV builds. The fix is summarized in SRP Bulletin 22-062 (pdf), which is also reproduced below:


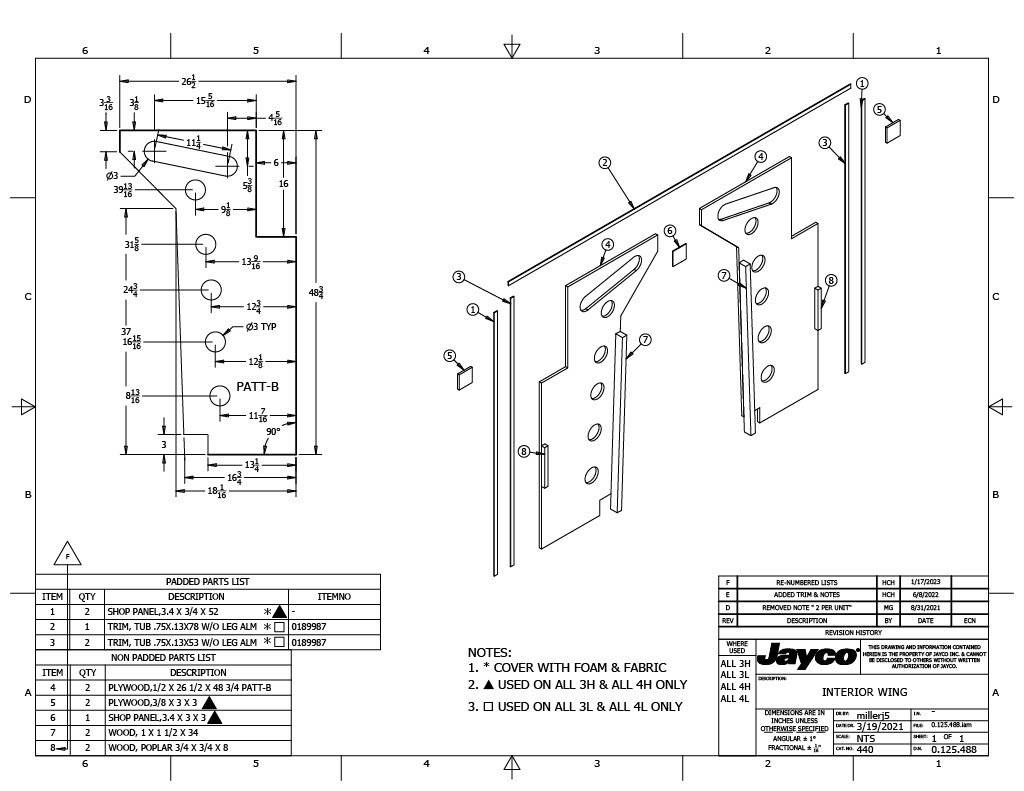
Jayco also released an “Interior Wing” schematic for the dimensions of the plywood wingwall itself. However, the dimensions don’t necessarily agree whose in SRP Bulletin 22-062. For example, wood backer (8) is noted as being 3/4” X 3/4” X 8” in the schematic, but in the but SRP Bulletin 22-062, the backer is described as being 1”x4”.
The Jayco/Entegra Wing Wall fix is not exactly a model of clarity. The basic idea is to attach full-sized plywood “Wing Wall” panels to new wooden backers to better onnect the coach to the cab via the Wing Wall. The backers themselves are fastened to the coach wall, bunk floor, cab using adhesive and screws.
The WIng Wall fix also involves he installation of adhesive and (many) more screws from the cab roof up into the bottom of the bunk floor platform overhead (about every 2'“). Although not entirely clear, the Wing Wall fix also appears to call for the addition of more self-tapping screws into the rounded fiberglass corners to better them to the metal cab.

A drill with a 90-degree attachment may be useful to attach the new 1/4” backer.

A drill with a 90-degree attachment may be useful for adding the new screws into the cab roof up into the over-the-cab bunk floor.

Pro Tip: A drill with a 90-degree attachment (like the Millwaukee 205-22 M12 shown above) may be useful for the Wing Wall repair project. In additon to using the drill to attach the new 1x4” backers near the house wall, the some Accolade/ Seneca owners have used the drill to add the new screws in the cab ceiling without the need to completely remove the cab headliner.
Are there Variations to the Wing Wall Fix in SRP 22-062?
Some Seneca and Accolade owners who had to perform the Wing Wall repair themselves made the repairs prior to the issuance of SRP 22-062 so they did not have the document as guidance. Other RV owners have modified the repair in one or more ways as well. Some of those variations include:
(1) Through-Bolting the Over-the-Cab Bunk
Let’s face it, RV manufacturers just l.o.v.e. self-tapping screws. These are not the most robust fasteners though. Here’s a photo from a Jayco Seneca owner who used bolts instead of screws to secure the over-the-cab bunk to the truck cab.

One RVer Through-Bolted the Over-the-Head Bunk to the Cab
(2) Through-Bolting through the Fiberglass Cab Corner
Jayco recommends adding #10 x 1” 3/8” sheet metal screws (Jayco calls them “lags” in reference to FIG. 14 and 17 and “self-tapping screws” in the parts list and also in reference to FIGs. 15-18) to secure the fiberglass cab corner into the vertical B pillar of the cab. Other RV owners have decided to through-bolt instead.

One RVer decided to through-bolt the fiberglass to the cab in his Jayco Seneca as part of the Wing Wall fix.
(3) Better Securing the the Fiberglass / Metal Cab Corner Interface
One Jayco Seneca Owner also added adhesive to between the cab and the radius in the fiberglass where it wraps around the corner of the cab. Depending on the location of the existing screws, additional screws may be added to this area as well.

Adhesive is added between the fiberglass and cab near the rounded cab corner.
(4) Changing the Notches and Holes on the Wing Wall Plywood Panel
Because the Jayco plywood schematic is for actual floor production by Jayco/Entegra, there are 6”X16 and 3”X3.5” notches where electrical lines or other components may need to be run. These notches may not be necessary for RV owners attempting the Wing Wall Modification themselves, depending on the model. Moreover, by removing the notches, the Wing Wall can be secured around the entire perimeter of wall. Likewise, the location, size, shape of the holes (and even the necessity of making them) in the plywood panel might be different for older Jayco Senecas and Entegra Accolades, depending on the model. The main purpose of the circular holes are to enable to the plywood to lay flat against the fiberglass corners where screws connect the fiberglass corner to the metal cab B-pillar.

The location of the holes and cut-outs may be different than the Jayco plywood schematic.

Wing Wall repair on a Jayco Seneca with only 1 hole in the Wing Wall
(5) Addressing the Horizonal Seam Behind the Wing Wall
Just behind the driver and passenger seat, there’s a horizonal seam that will be visible during the Wing Wall project. The seam is held together by….you guessed it….self-tapping screws.
Some RV owners have added adhesive (to the extent possible) to this area and through-bolted the connection.


The Jayco & Entegra factories love self-tapping screws!

Replacement of self-tapping screws with through-bolts
(6) Adding Insulation and/or Sealing the Wing Wall Gaps
Once an RVer has torn about his/her Seneca/Accolade to do the Wing Wall repair, they may notice gaps or daylight in some places. May people have sealed those gaps with suitable sealant or spray foam. Others have added insulation to the space behind the Wing Wall and the fiberglass cab corner.

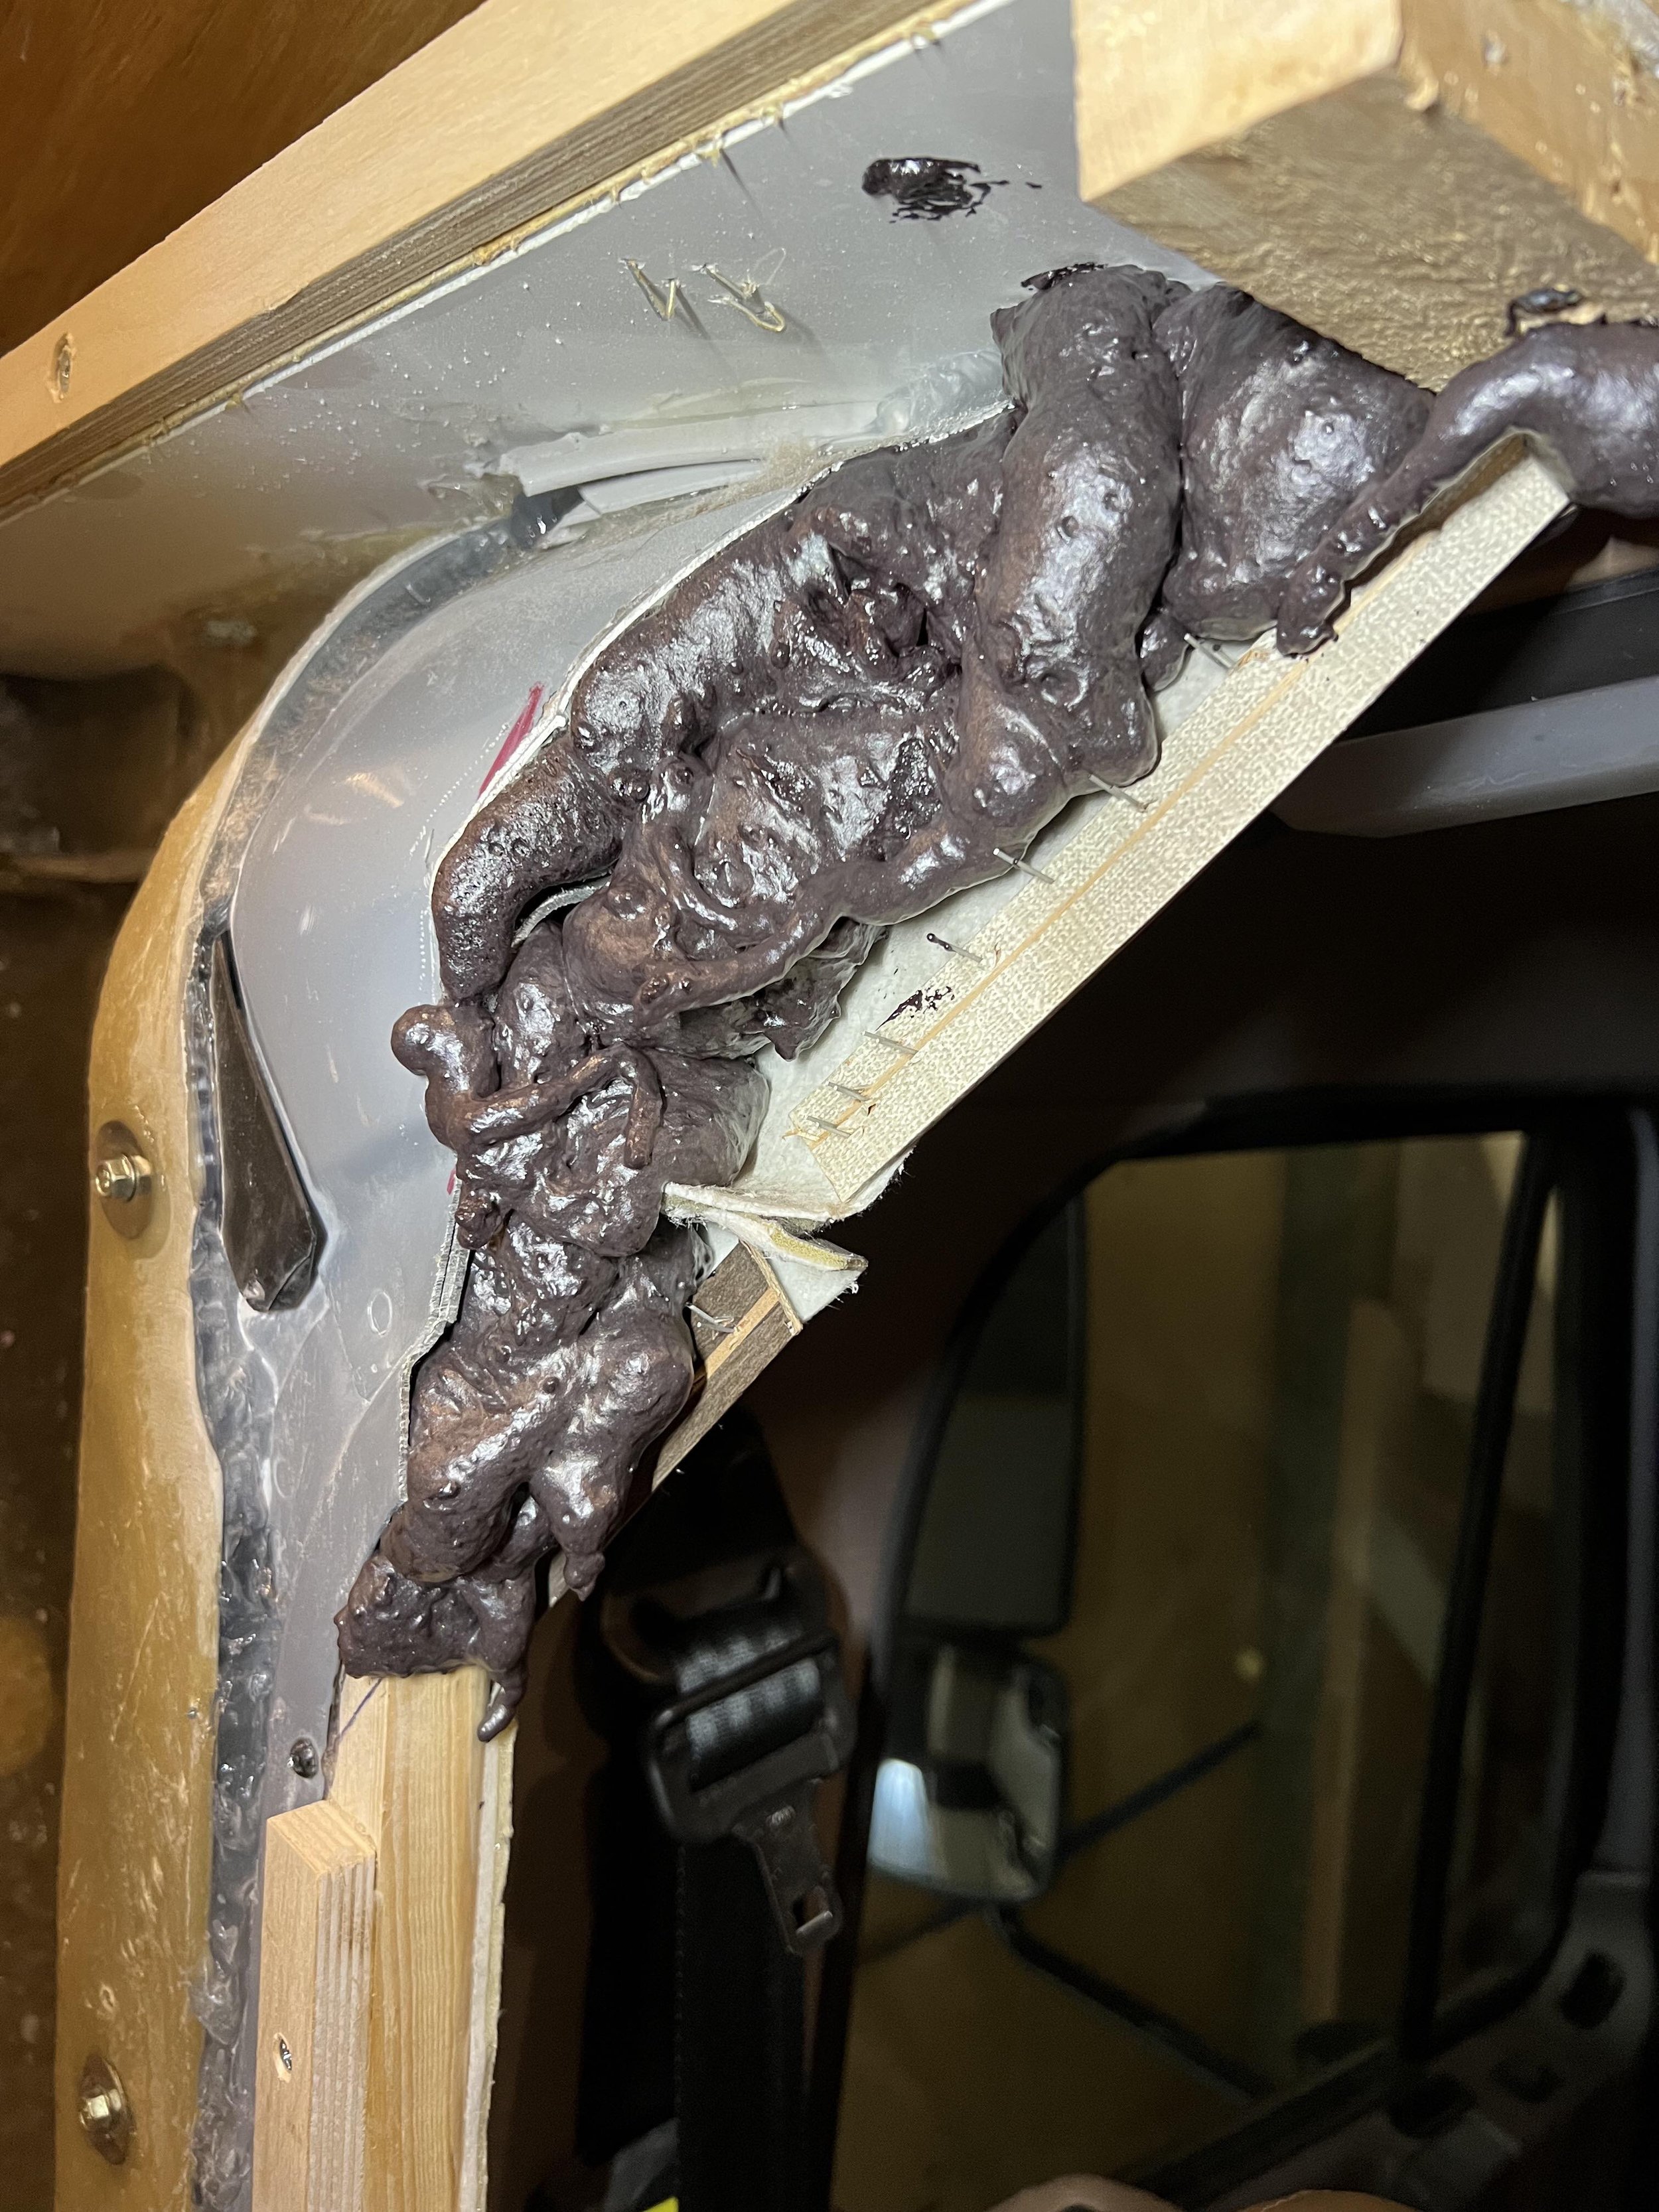
Spray foaming gaps as part of the Wing Wall repair project.
How Does an RV Owner Know if They Have the Wing Wall Fix?
Jayco and Entegra started installing the new Wing Wall design sometime in 2021 or 2022. Unfortunately, to our knowledge, neither Entegra nor Jayco kept any records to tell owners whether their RV had the wing wall fix. Some 2021 models reportedly have the fix. Some 2022 models reportedly do not have the fix. To ascertain whether a rig made in this timeframe has the wing wall fix, an owner of the RV will need to do what we did:
(1) Step 1: Remove the decorative panel over the Wing Wall.
The Wing Wall is covered by a decorative panel that sits behind the driver’s side of the RV. Once that is removed, the underlying plywood panel is the “Wing Wall.”
Pro Tip: Decorative buttons are often used to cover the screws that fasten the decorative panel to the underlying plywood panel. A putty knife or flat-head screwdriver can usually be used to remove the decorative buttons.

Screws are behind these decorative buttons
(2) Step 2: Inspect the underlying plywood panel.
For those RVs having the wing wall fix, there will be a “full” plywood wing wall panel with a series of circular-cut-outs where several screws have been used to secure the fiberglass to the font cab as generally shown above in the “New” Wing Wall photo.
What is the Vertical Seam Separation Problem?
Each house side wall of the Accolade/Seneca is connected to over-the-cab bunk area by a vertical seam. The seam actually extends below the over-the cab bunk area and connects the house side wall to a front cab corner wall. Over time, the exterior self-tapping screws in the seam back out.
Many people believe that the Vertical Seam problem is related to the flexing caused by the Wing Wall problem. I also believe that the Vertical Seam problem may be accelerated whenever the front wheels come off the ground due when improperly leveling the rig.
How is the Vertical Seam Separation Problem Fixed?
Jayco/Entegra do not have a service bulletin on how to fix the Vertical Seam problem. Some RVers have tried replacing the factory screws with larger screws and/or rivets in the seam, only to have the seal fail again.
To fix the Vertical Seam problem, several RV owners have recently resorted to what they call the “NUCLEAR OPTION.” ☢️☢️☢️. Sounds scary, right? This fix involves placing an aluminum strip on the interior and then through-bolting at the seam. The fix will look something like that below:
Two of our friends, Barbie and Mike, had a big Vertical Seam problem and we helped them fix it. Here’s what we learned.
Vertical Seam Separation Fix - “Nuclear Option” Parts List
The parts list for the Nuclear Option project include:
10-24 x 3” stainless steel machine bolts (~4 dozen)
3/16 x 3/4” stainless steel washers (~ four dozen)
10-24 stainless steel locknuts (~four dozen)
3/16” x 1.5” (can be wider, e.g., 3”) x 8’ aluminum strip (cut to fit) (2)
Drill with jobber bit (6” or more)
Sealant (e.g. Proflex RV)


Vertical Seam Separation Fix - “Nuclear Option” Steps
The main steps for this project include:
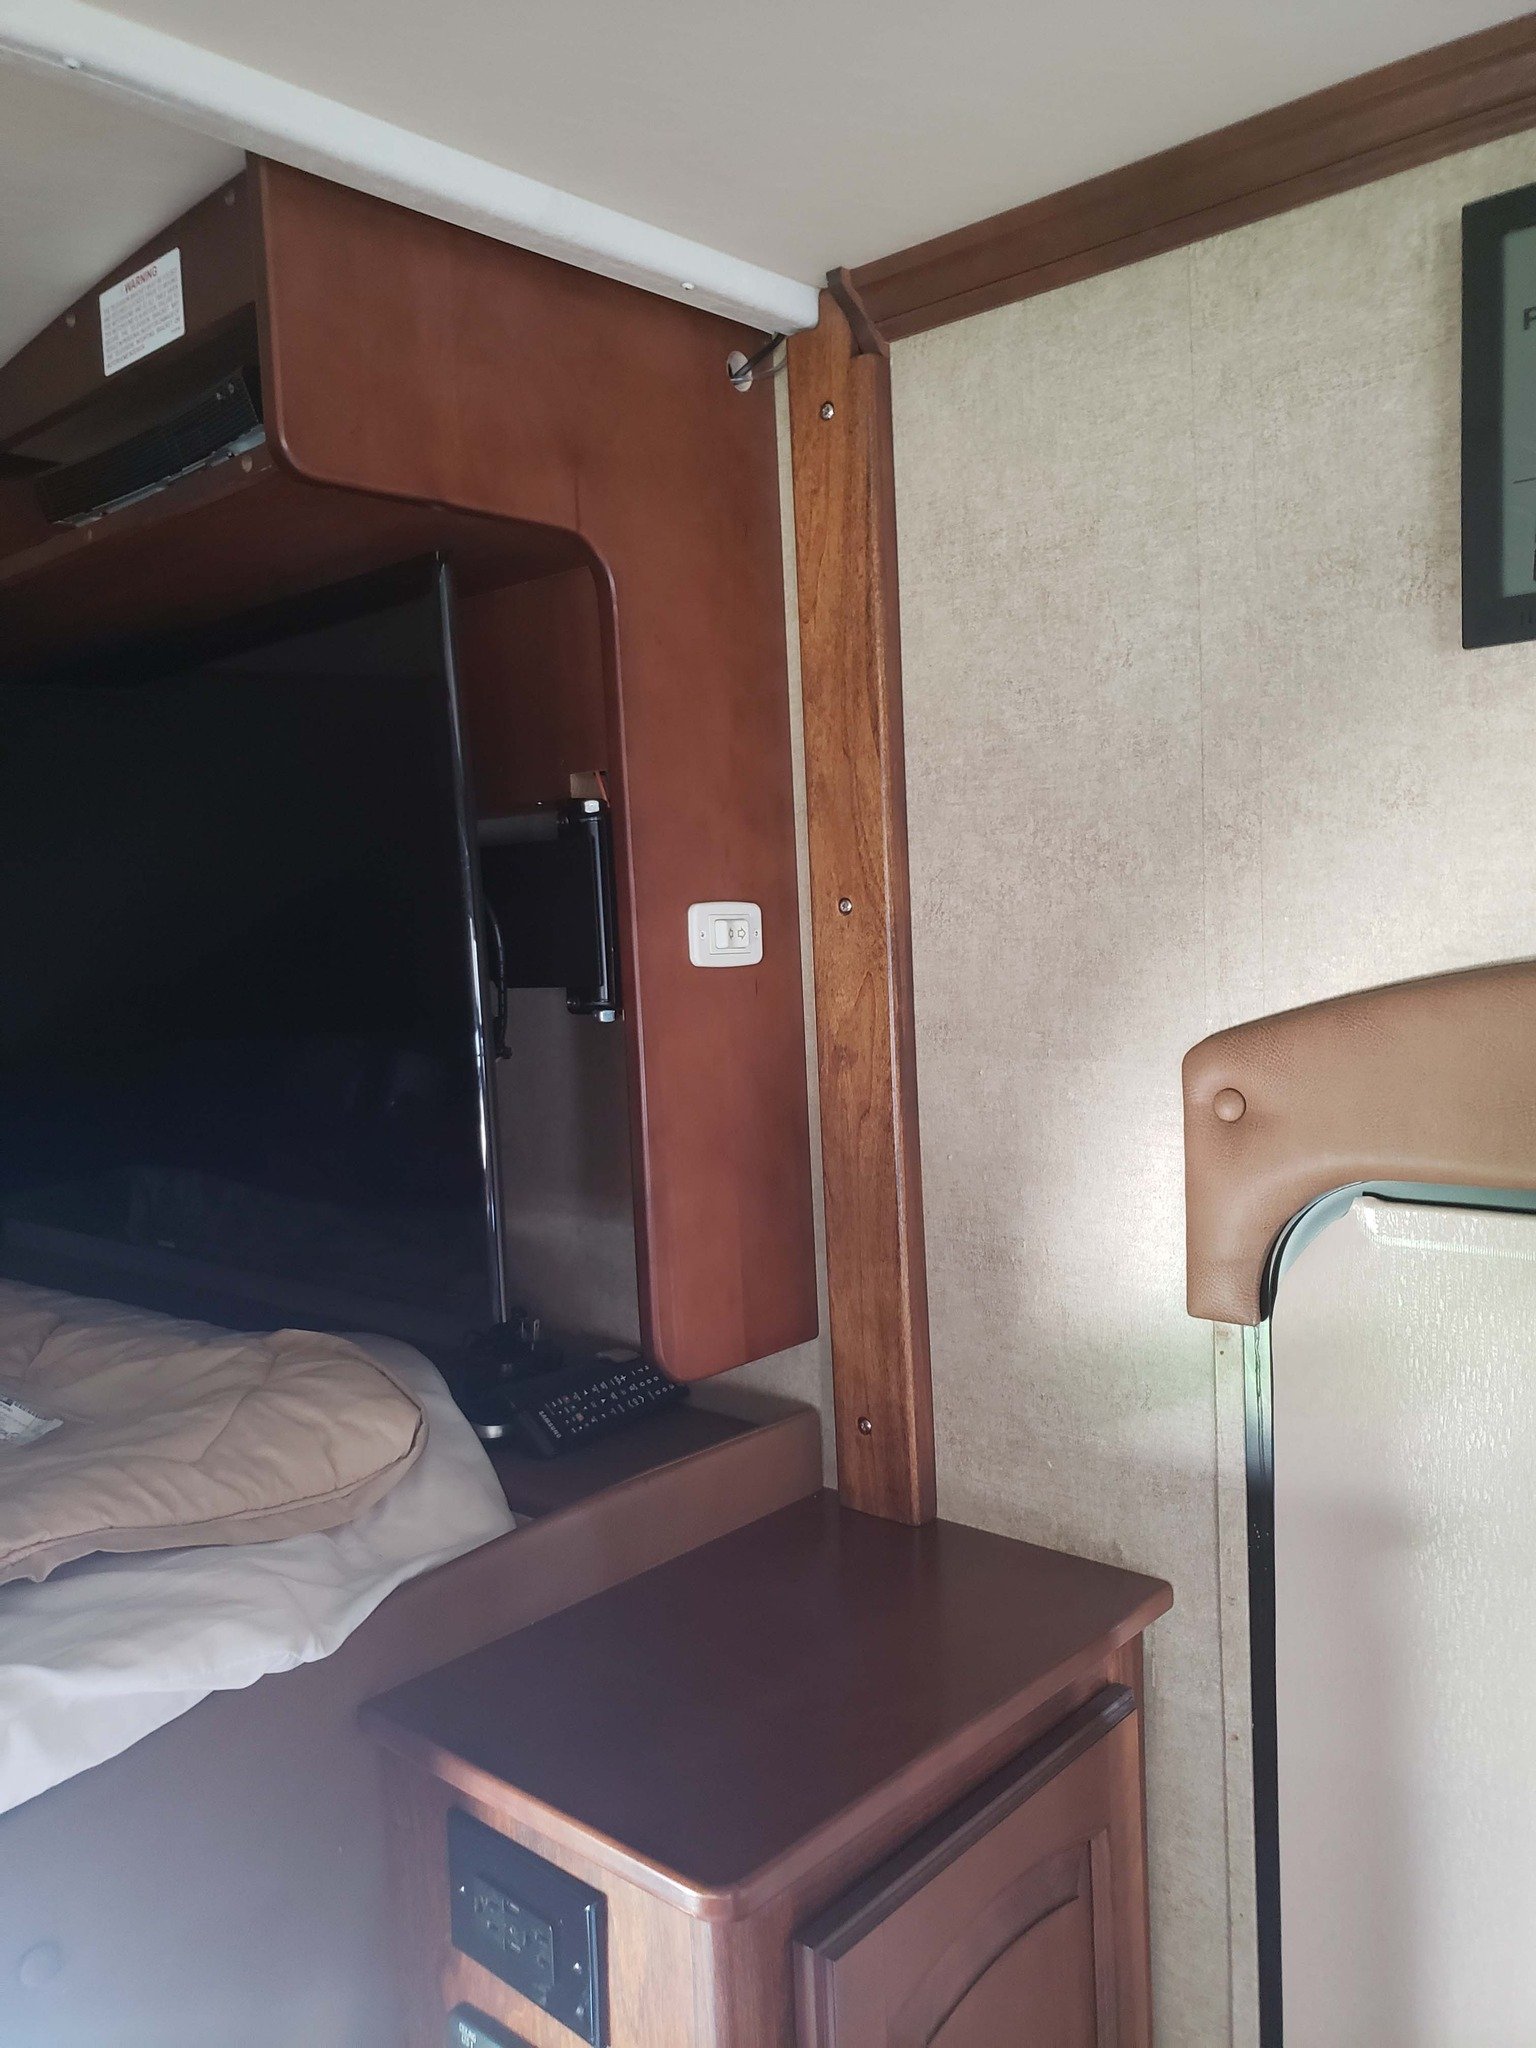
(1) Remove any cabinetry on the interior of the coach opposite the Vertical Seam.
This is perhaps the hardest part of the project because many cabinets by the door contain wiring for the main power switch, Xantrax, and/or lighting. Be sure and take photographs of the wiring to help with reassembly. One RVer had to remove an entire fireplace!
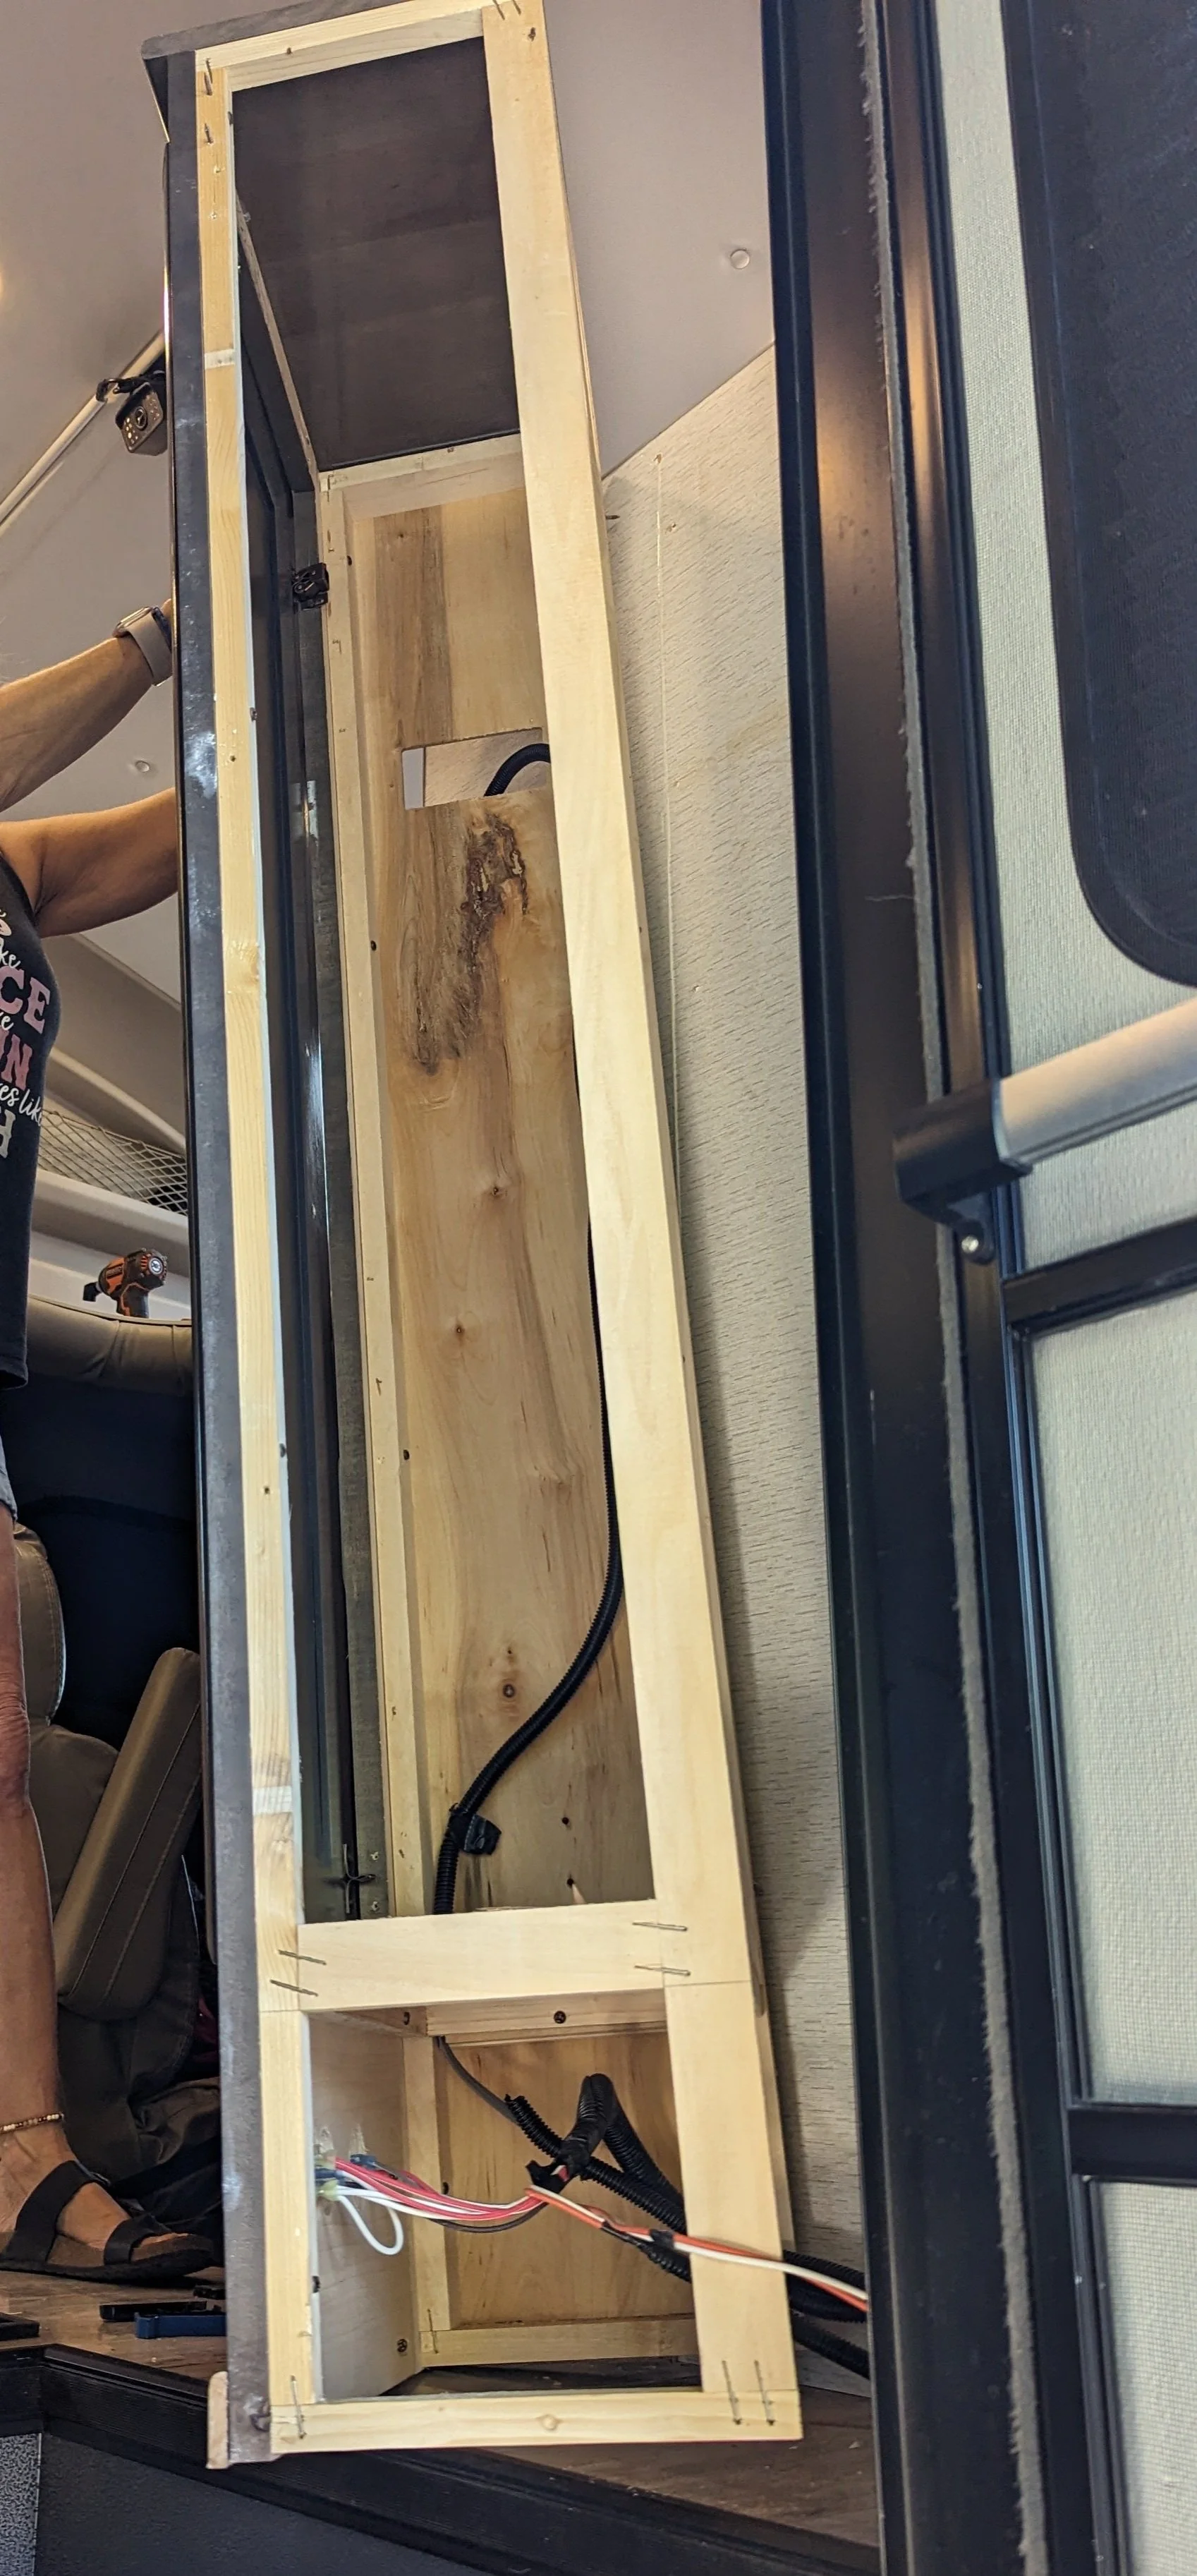
Our friend, Barbie, holds the cabinet that we had to remove to access the Vertical Seam from the interior of a 2022 Entegra Accolade XL 37L

Remember to take photographs of any wiring in the cabinetry!

Cabinetry removal may be the hardest part of fixing the cab separation issues in a Jayco Seneca or Entegra Accolade
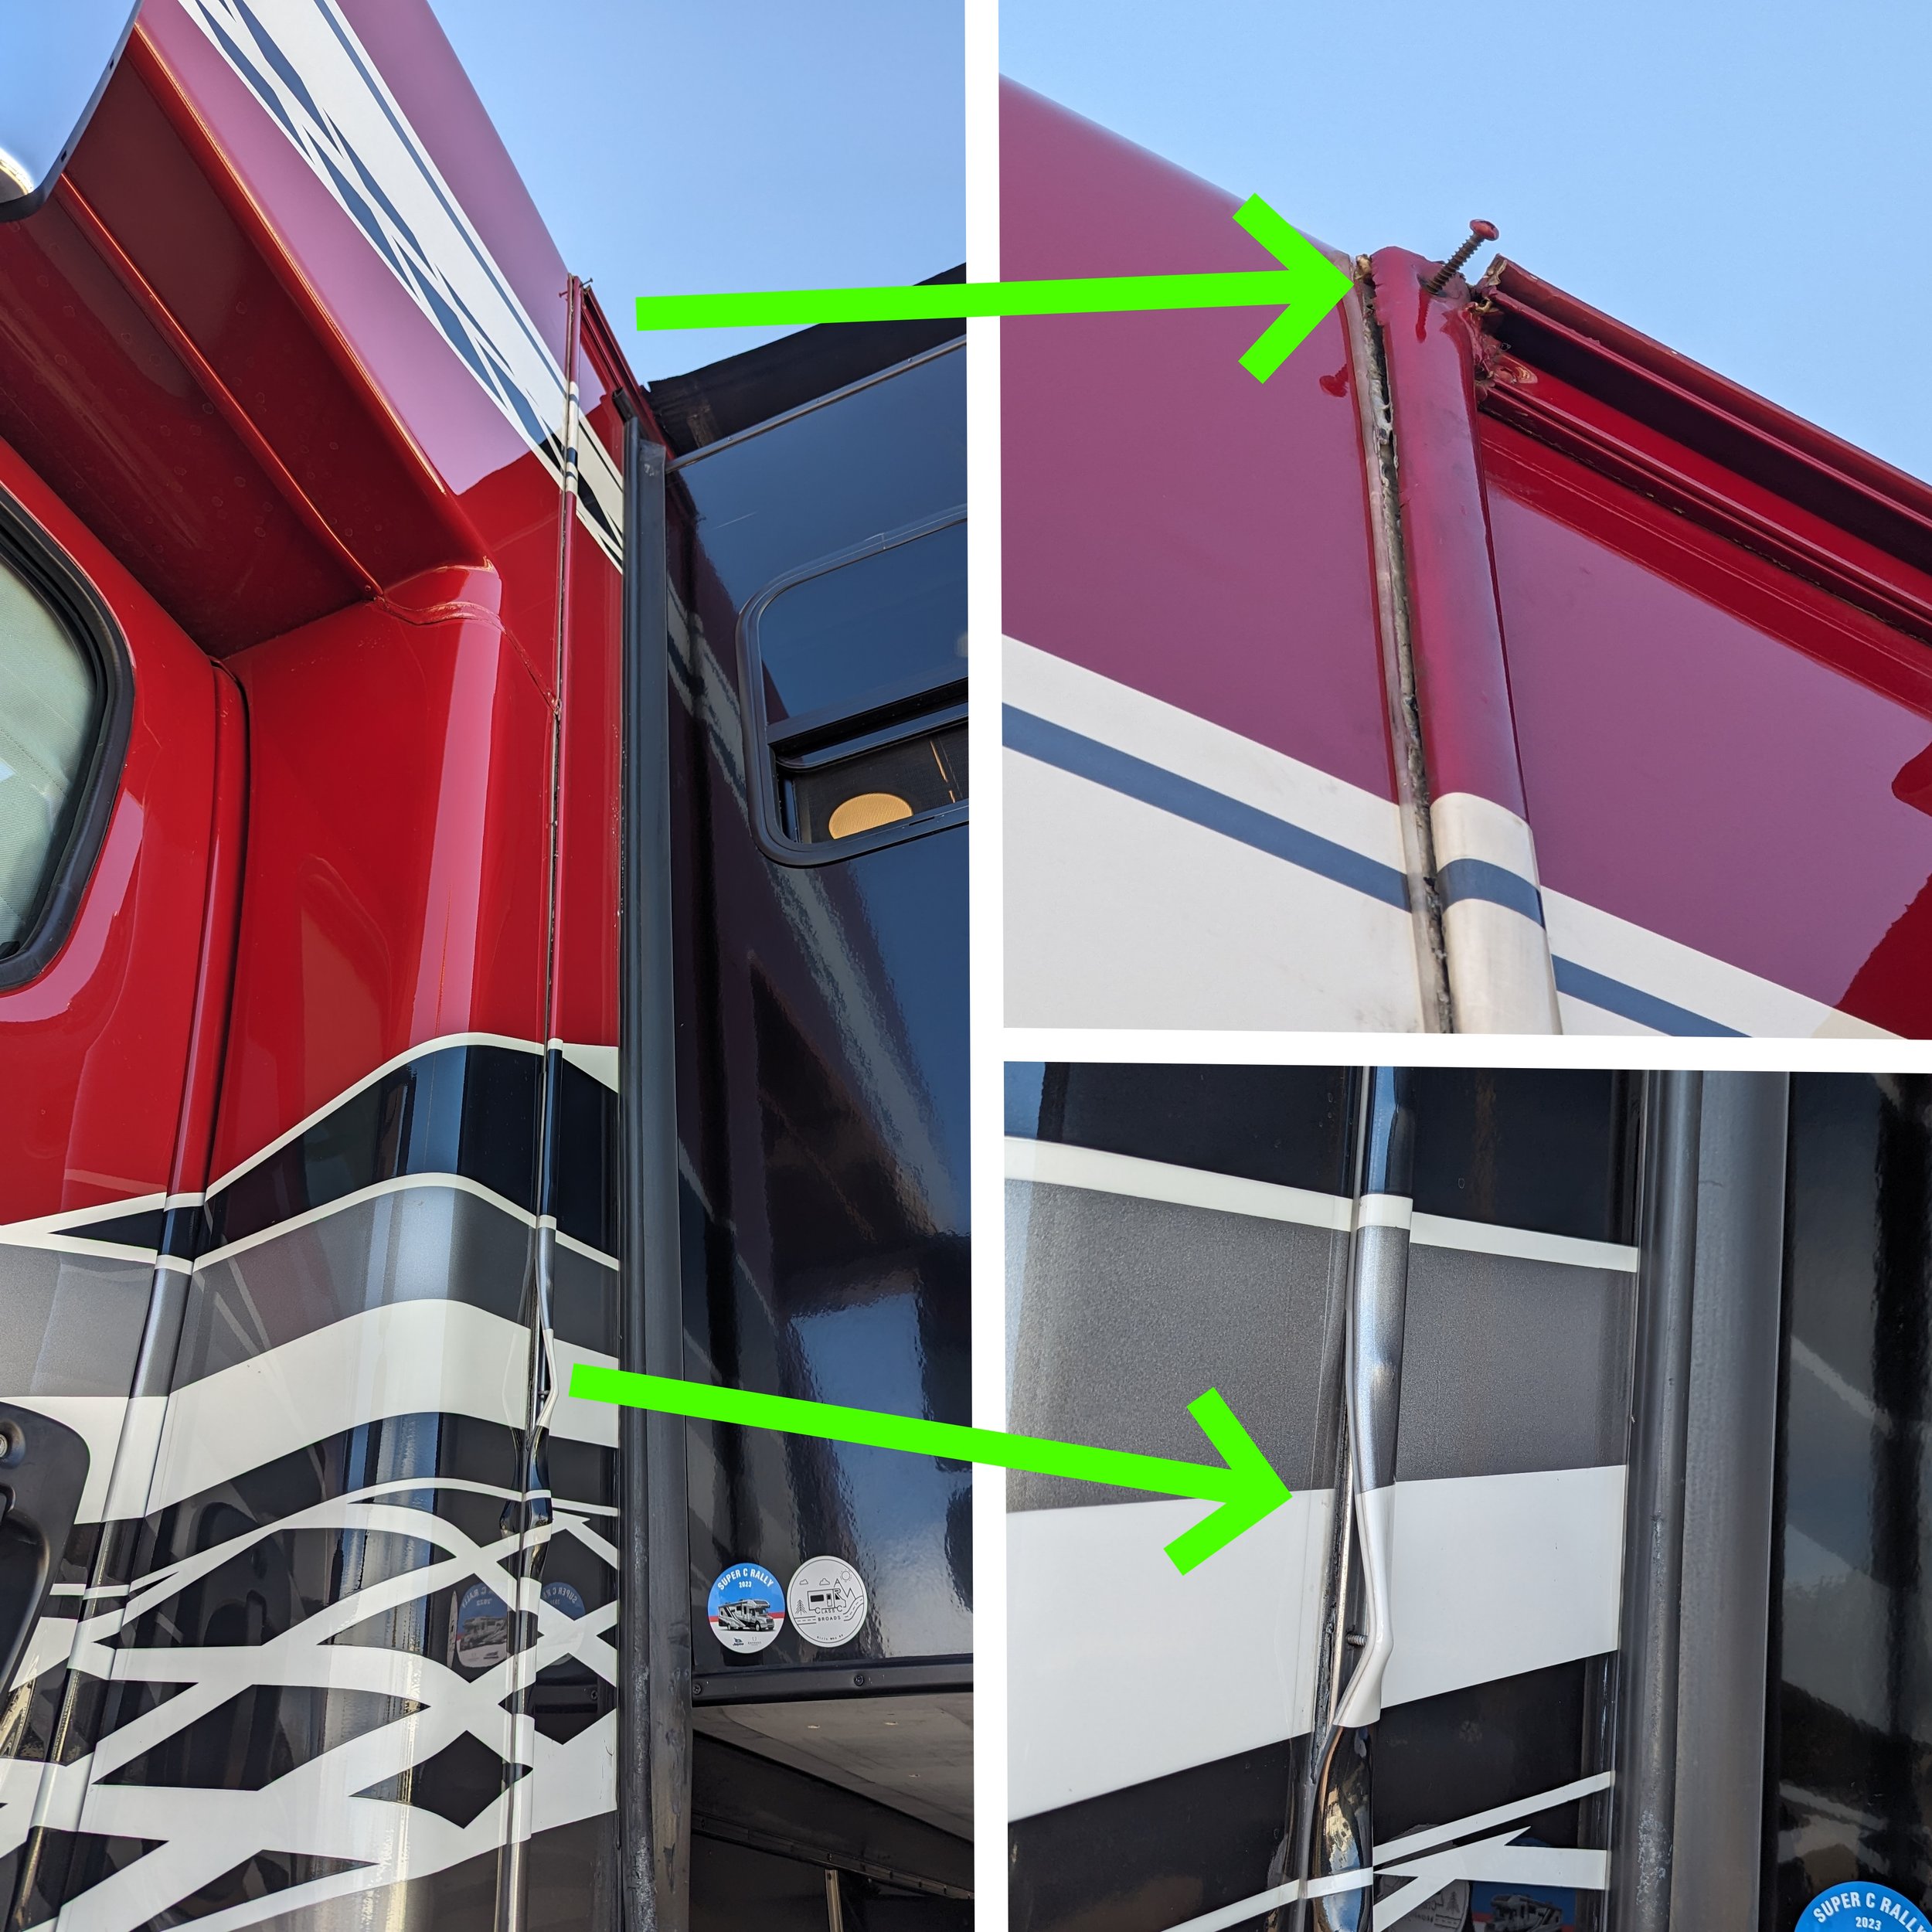
(2) Remove the exterior vinyl trim.
Use a knife to separate the exterior vinyl trim from the exterior wall of the coach.
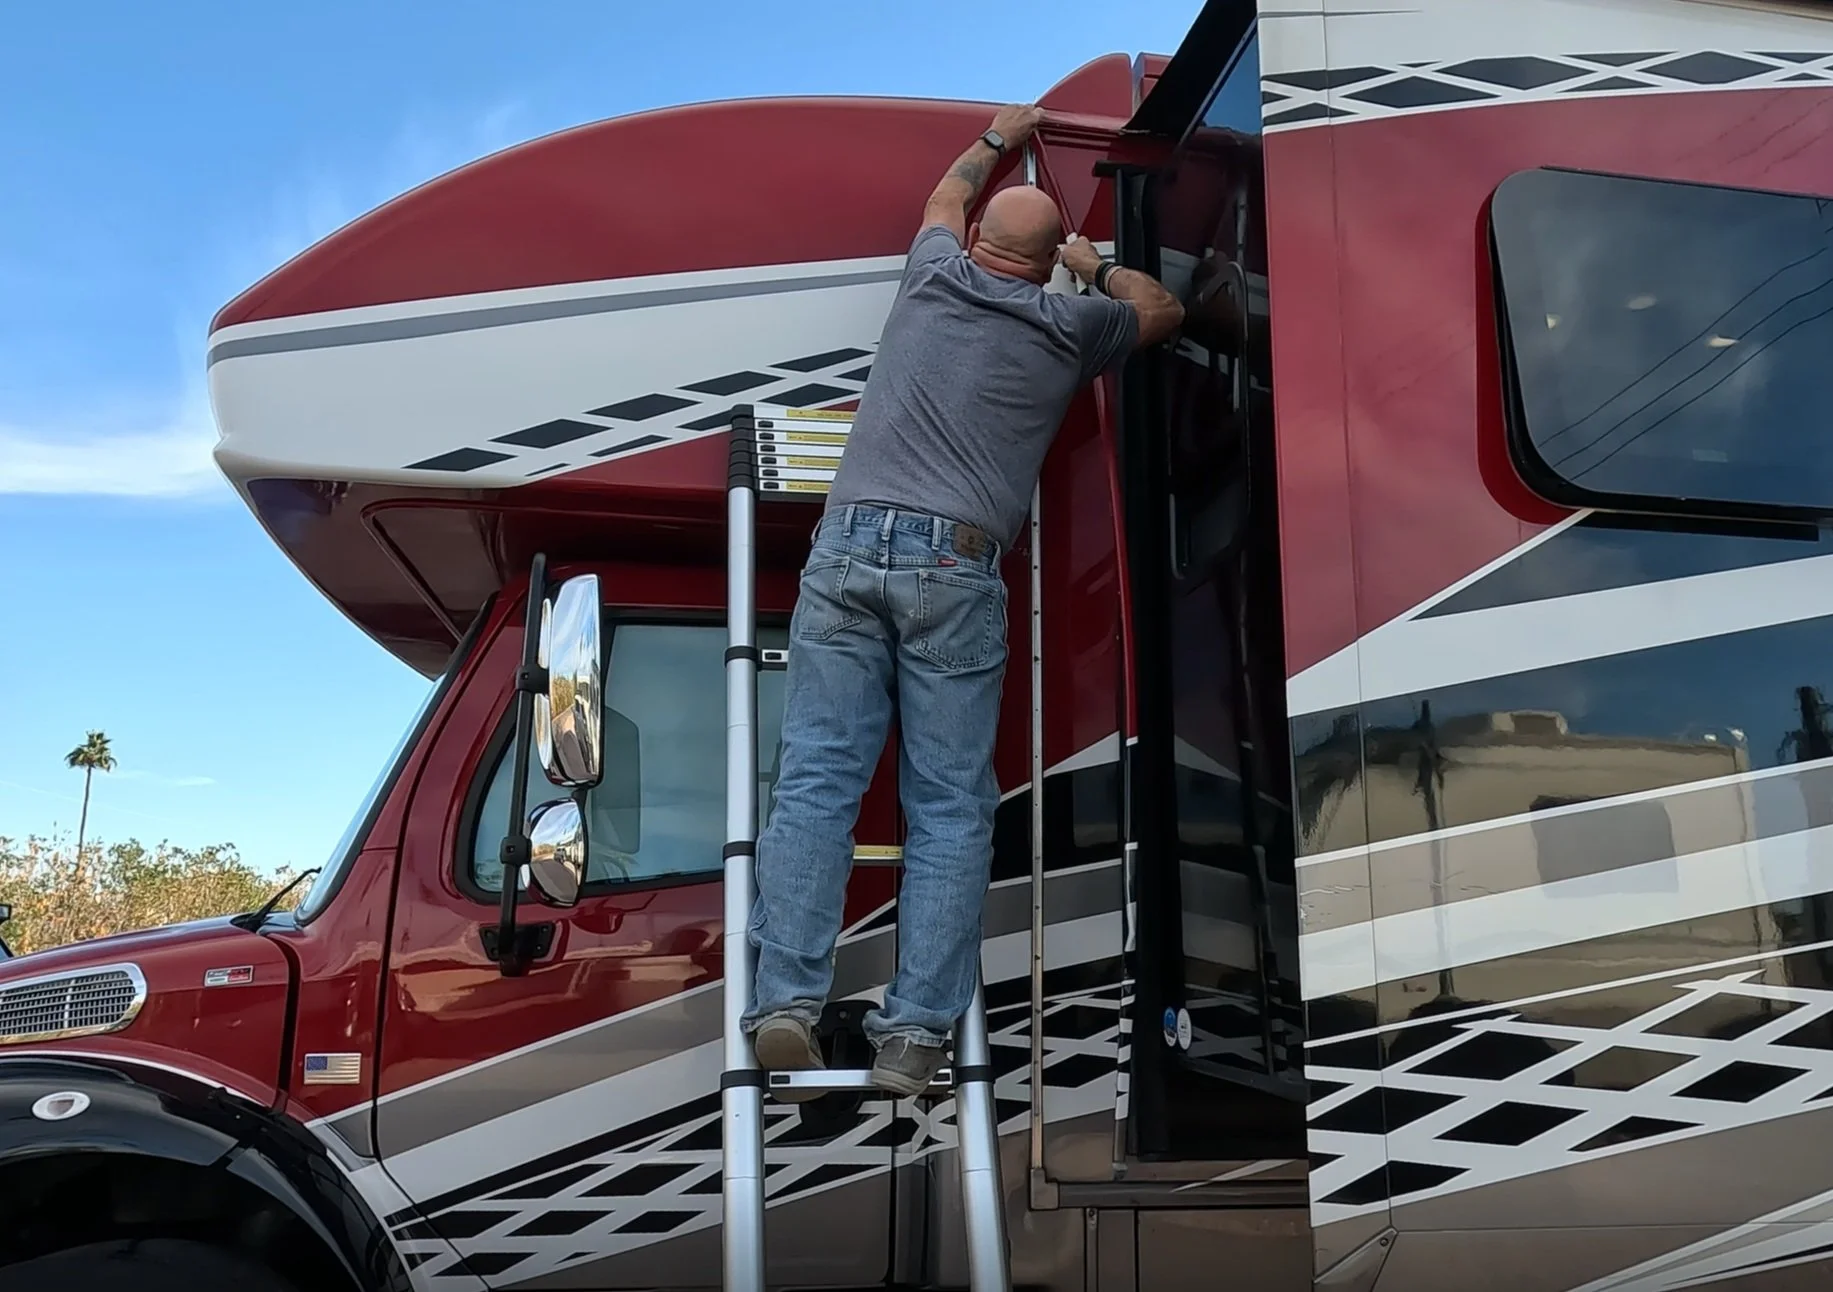
Our friend, Mike, is removing the vinyl trim covering the Vertical Seam
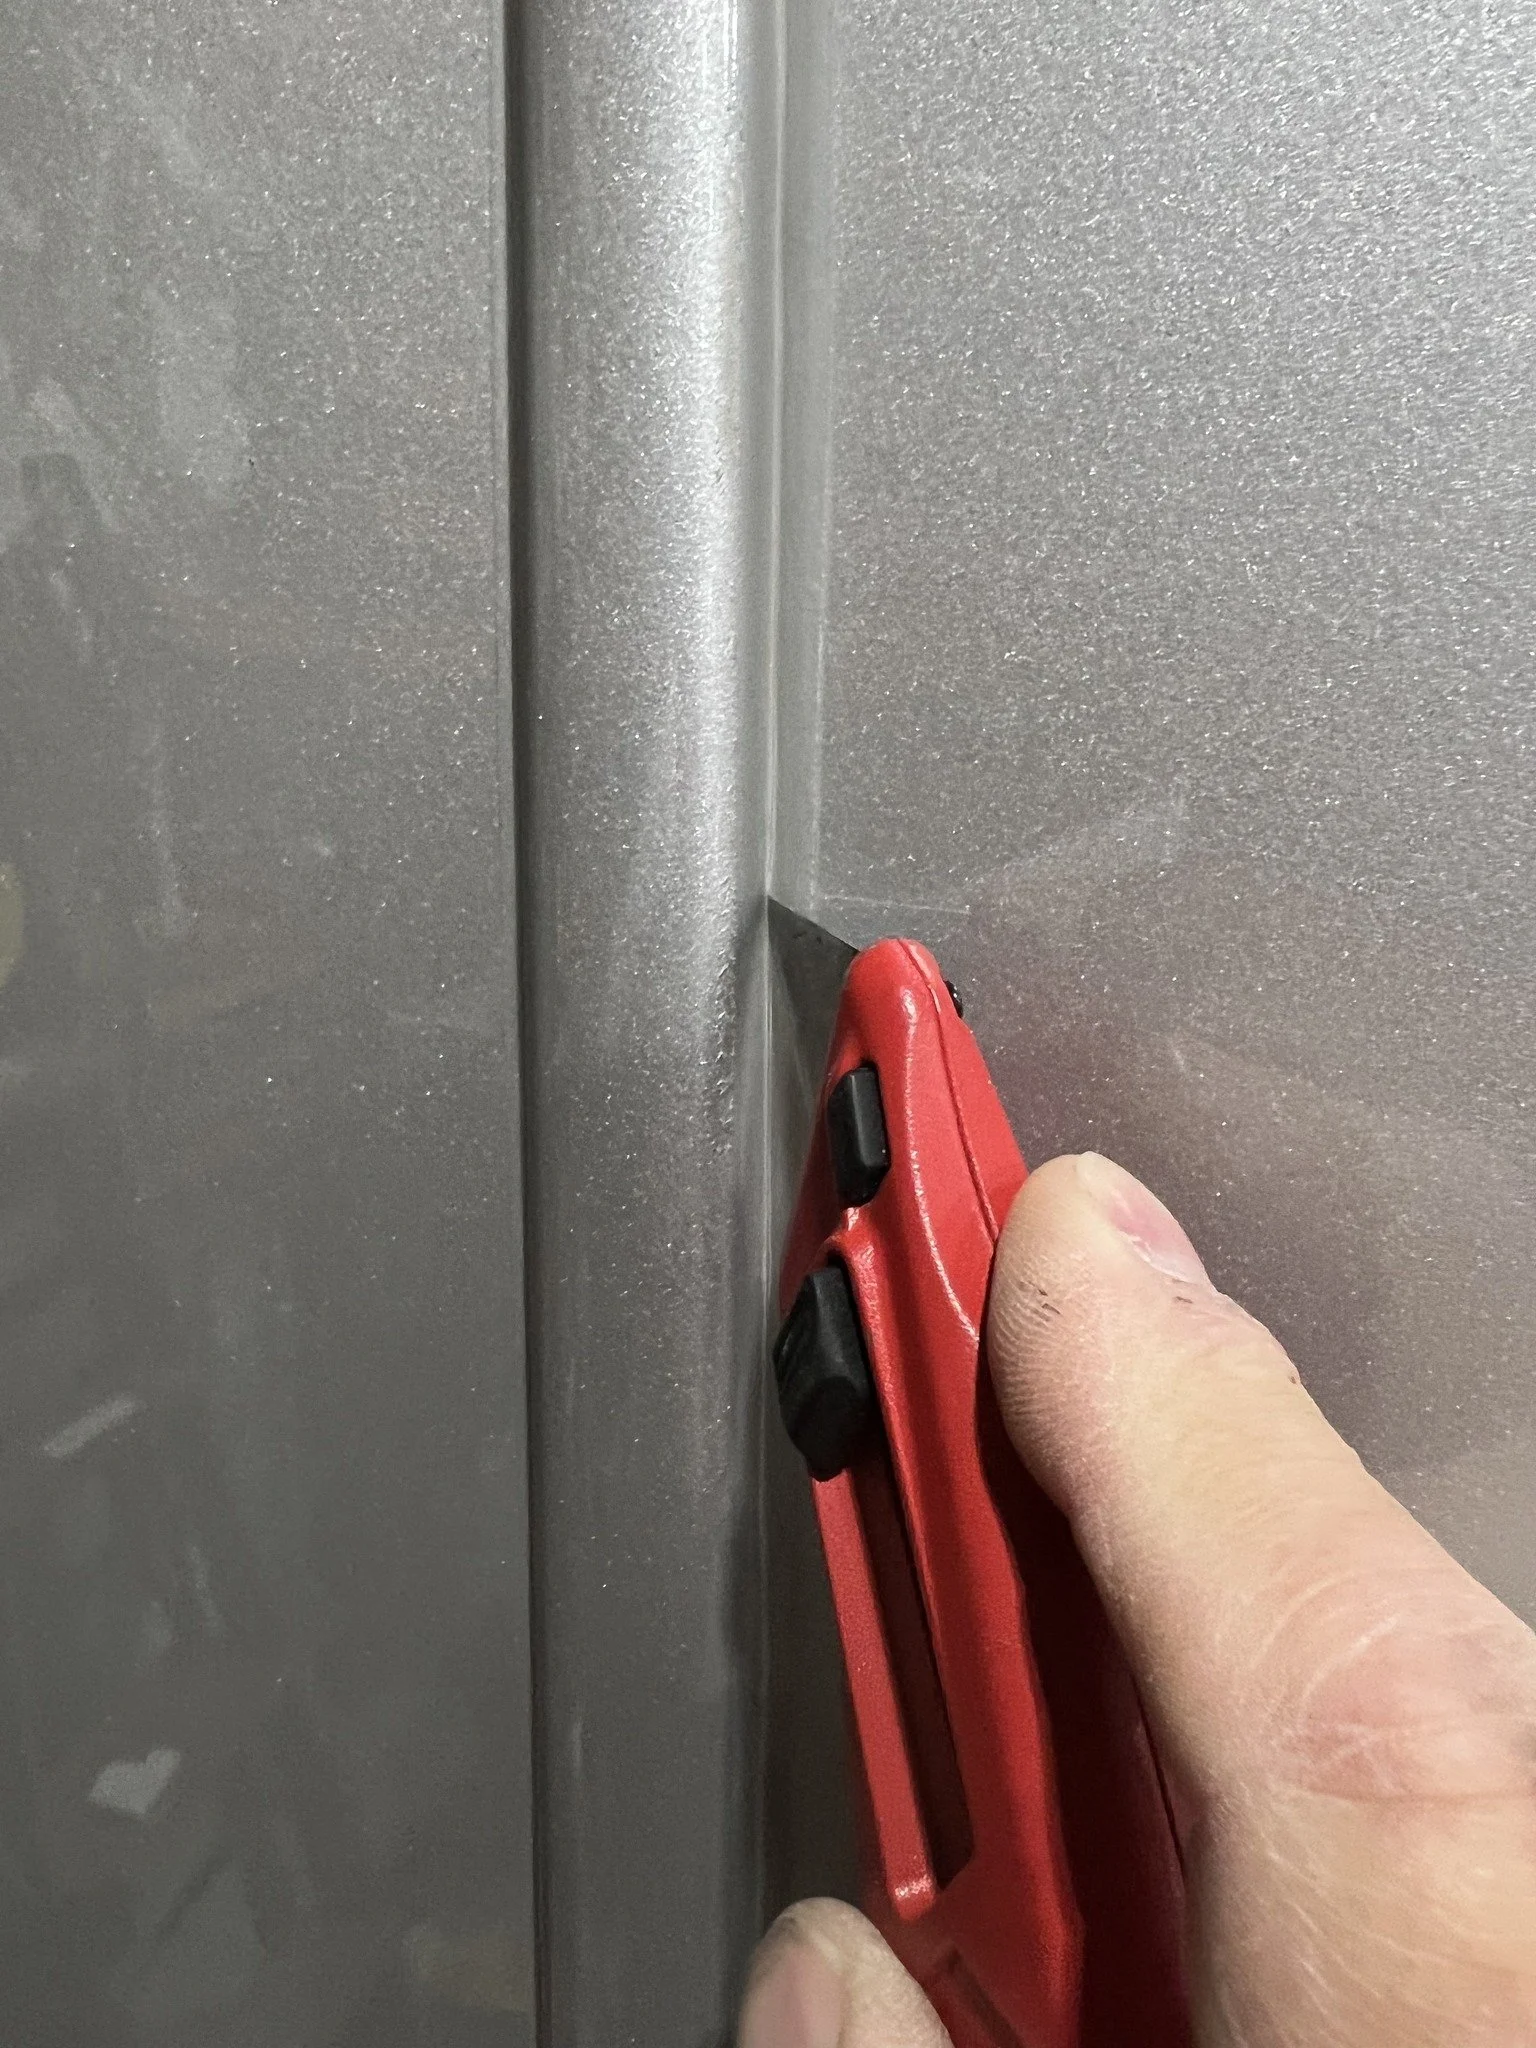
A knife is used to remove the vinyl on the Vertical Seam where it is still attached.

We found that simply placing the vinyl trim in the sun (~ 70 F) made the trim quite flexible.
Pro Tip: If the exterior vinyl trim is deformed, the material becomes quite malleable with just a little heat. We were able to reshaped the trim by laying it in the sun.

One RV owner completely removed the aluminum strip to repair the Vertical Seam problem in his Jayco Seneca.
Pro Pro Pro Tip: At least one Jayco Seneca owner completely removed external aluminum strip as well as the underlying butyl caulk. The aluminum strip will likely need to be gently tapped back into shape and completely cleaned with solvent to remove all the old caulk tape. Before reassembly, the RV owner gently spread the body panels apart above the horizontal seam area up to close to the roof. He then applied Sikaflex 221 polyurethane adhesive in the joint and a new strip of 1" wide butyl tape where the external aluminum strip was to lay. Mike and Barbie elected to keep the aluminum strip in place and not remove it.
(3) Remove Three Screws.
These three screws should be located generally at the top, middle, and near the bottom of the exterior metal connector.
Pro Tip: The Vertical Seam will likely dip below the flooring of the coach. The “near the bottom” screw needs to be above the flooring in order to through-bolt it. For the screws below the flooring of the coach, most RVers have replaced those screws with larger screws instead of through-bolting.
(4) Drill Three Corresponding Holes.
Drill three holes through the entirety of wall where the three screws have been removed.
Make sure the drill bit is at least 6” long.

A hole is being drilled through the wall of an Entegra Accolade where a “near the bottom” screw was located in the Vertical Seam

Our friend, Mike, drills through his coach where a “middle” screw had been in the vertical seam.
(4) Align and Fasten the Aluminum Strip to the Interior Wall where the Three Holes are Located.
Begin by placing the aluminum strip on the interior wall so that the three holes are centered on the aluminum strip.
From the exterior, drill though the middle hole into the aluminum strip. (Note: it may be easier to pre-drill the middle hole into the aluminum strip).
From the exterior, insert a bolt through the middle hole in the wall and aluminum strip.
From the interior, secure the bolt using a washer and locknut. Hand tighten.
Repeat the foregoing for the top and near bottom holes so that the aluminum strip is secured along the seam at the three points.
Pro Tip: Find a friend. This is definitely a two-person job.

Washers and Locknuts are used to secure the aluminum strip in the “nuclear option.”
(5) Keep on Drilling, Screwing, and Bolting.
Continue replacing all of original screws with the bolts/washers/locknuts.
Pro Tip: Use a board (not your hand) to secure the aluminum strip in place when drilling a hole through it from the exterior.

Kasie supervises our friend, Barbie, as Mike drills a hole through the aluminum strip to help fix the Vertical Seam problem on an Entegra Accolade.
Torque the locknuts to approximately 20 inch-pounds. That’s INCH-lbs, not FOOT-lbs.
(6) Cover the holes from the exterior with sealant.
As a precaution, many RVers have covered the exterior bolt heads with sealant, such as Pro Flex RV, prior to re-attaching the vinyl strip.
(7) Re-cover the exterior seam with the vinyl trim.
The vinyl trim should be malleable enough that it can be reattached to the rig using a rubber mallet.
Seal the vinyl trim with caulk or a suitable sealant, such as Geocel Proflex RV.
Pro Pro Pro Tip: Mask the vinyl trim joints if you can. Tape one side (either the front or the rear first) so there is approximately 1/4" gap between my tape and the vinyl trim. After applying a bead of caulk, immediately smooth the bead into the joint with a finger wetted with soapy water. After smoothing, immediately and carefully remove the masking tape by pulling away from the new caulk bead. Let the RV sit overnight so that the bead can cure. Repeat the process on the other half of the vinyl trim the next day.
(8) Reattach the Interior Cabinetry.
Re-attaching the cabinetry maybe trickier than it sounds.
For Barbie and Mike’s Entegra Accolade (a 2022 Entegra Accolade 37L XL), we had to notch out part of the cabinetry where the new bolts/nuts were positioned in order for the cabinet to be flush with the RV wall.
Luckily, the interior of the cabinetry is made with cheap soft pine so it’s pretty easy to remove the wood with something like a putty knife. We just used a pencil to mark where the new bolts/nuts were going interfere with the cabinetry and then made all of the notches at one time.
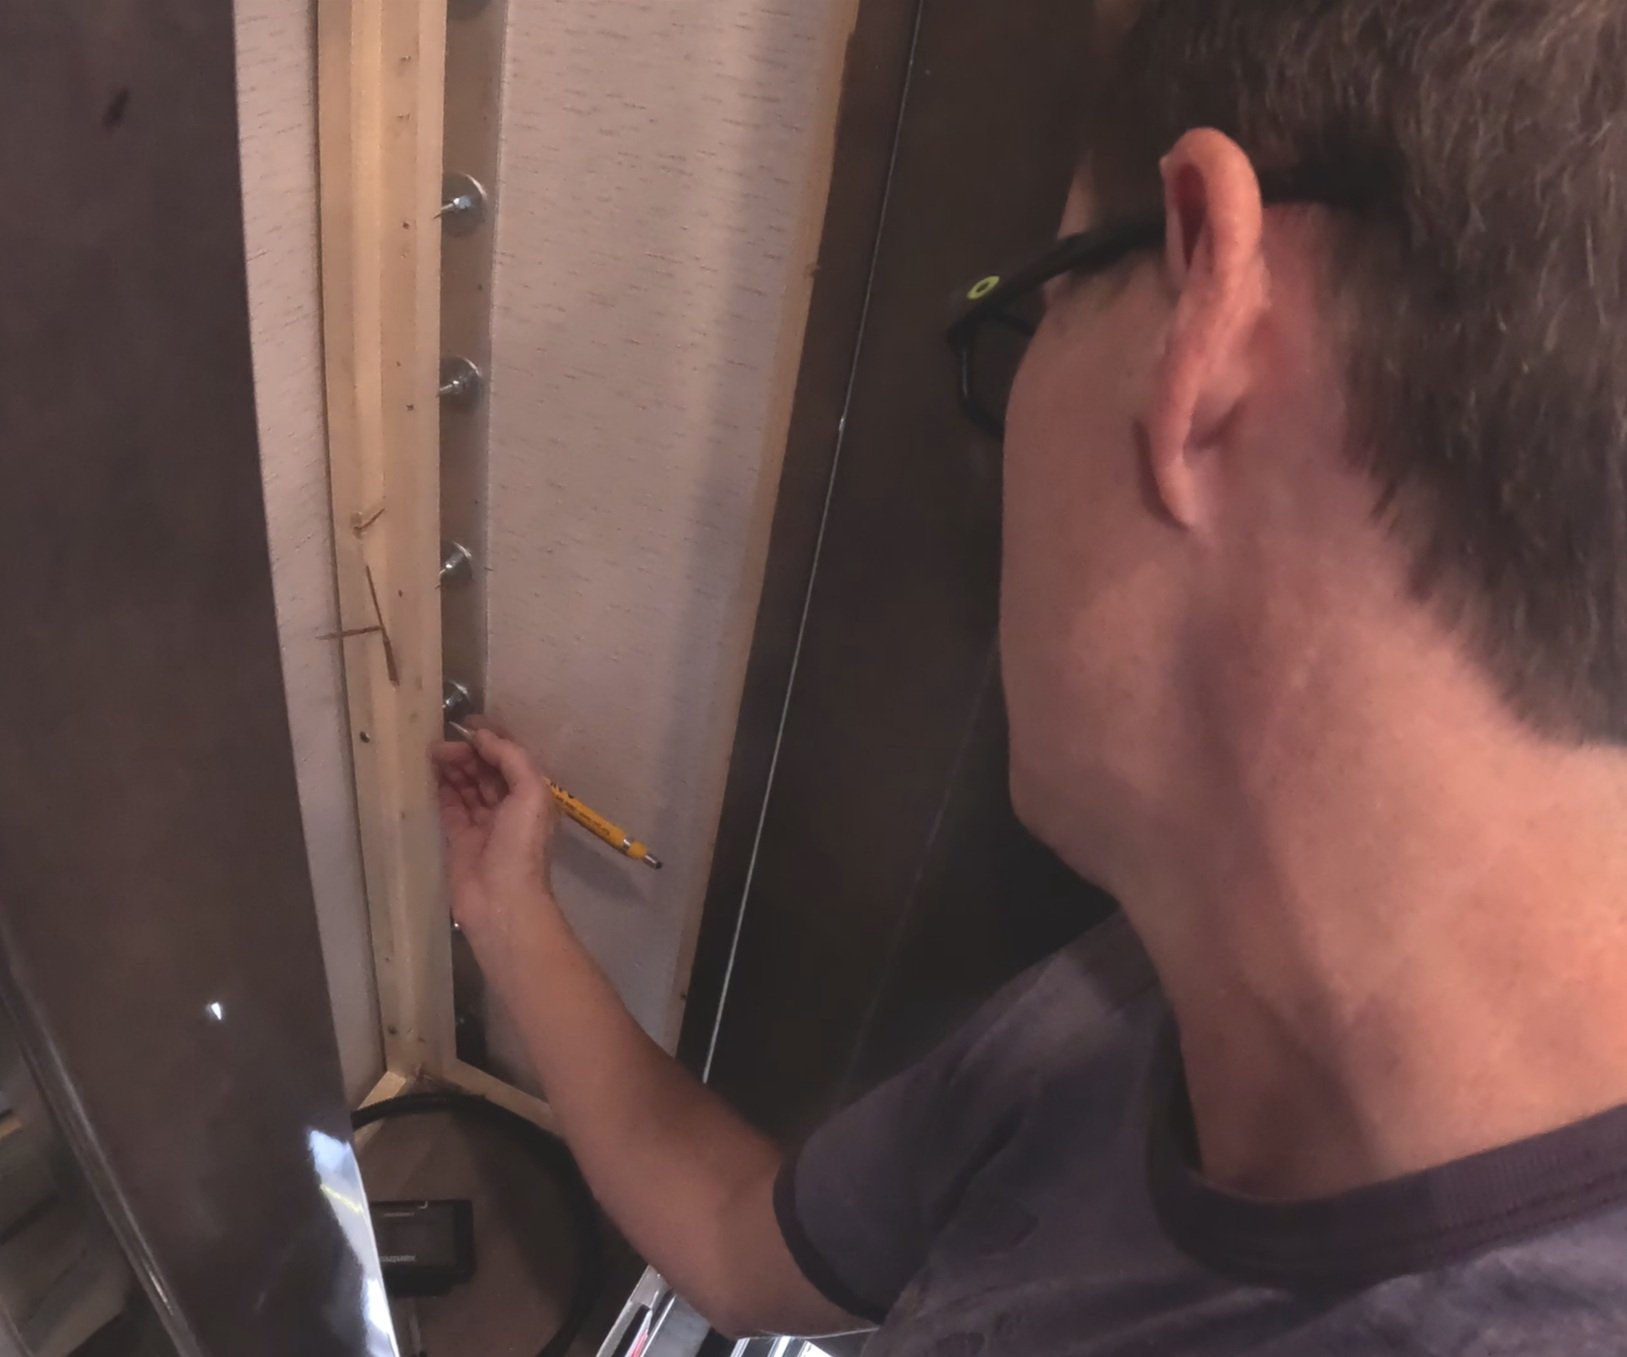
Kasie marks where the notches need to be made to reattach the cabinetry so that it is flush (2022 Entegra Accolade XL 37L)

Cabinetry Notches as part of the Vertical Seam fix on an Entegra Accolade 37L
(9) Trim Out Your Work
As pretty as that metal strip looks in the interior of the RV, you may want to cover your work with some decorative trim. We are yet to locate something that can be used off-the-shelf so you may have to custom-build the trim as others have done. If you know of a product that might work, please drop a comment or send a message to ClassCBroads@gmail.com so that we can update this blog.

A Jayco Seneca Owner makes a custom trim piece to cover the interior Vertical Seam.
Wow! Doesn’t that trim over the Vertical Seam fix look nice?
(10) Celebrate

You’ve just completed the “nuclear option.”
Crack a beer. (Or sip on a nice Iced Tea).
Eat some good Mexican food.
Celebrate!
Are the Wing Wall Problems or Vertical Seam Separation Problems Covered by the Jayco/Entegra Warranty?
Jayco and Entegra both boast about their industry-leading 2+3 year limited warranties….. BUT…..(There’s always a but, right?)
BUT how good are the Jayco and Entegra warranties?

Short Answer: Not very good.
Jayco and Entegra will likely cover the Wing Wall problem or Vertical Seam Separation problem ONLY under the two-year / 24,000 limited warranty.
That means:
RV owners who make a claim outside of the two-year window will be denied coverage.
Because Jayco/Entegra only warrants the RV to the first owners, people who purchase a used Seneca or Accolade will not have factory-issued warranty coverage.
*The warranty language in the Owner’s Manuals may have changed over time. Please consult with the Owner’s Manual for your specific rig and your attorney to help understand the scope. This blog has been prepared for general information purposes only. The information on this website is not legal advice. Legal advice is dependent upon the specific circumstances of each situation. Also, the law may vary from state-to-state or county-to-county, so that some information in this website may not be correct for your situation. Finally, the information contained on this website is not guaranteed to be up to date. Therefore, the information contained in this website cannot replace the advice of competent legal counsel licensed in your jurisdiction.
Scope of the Jayco Seneca Limited “Structural” Warranty
Text from Jayco stating that the Wing Wall problem is not covered by the 3-year structural warranty.
In 2019, to much fanfare, Jayco announced that it would offer a three-year ""Limited Structural Warranty” to certain 2020 RV models, including the Jayco Seneca. One would think that the Jayco “structural” warranty should cover the Wing Wall problem given that it involves, among other things “cracking” at the transition between the cab and house. Likewise, one would think that it would cover the separation in the Vertical Seam. Those things sound pretty “structural,” right?
Let’s take a quick look at the “limited structural warranty” language.
The Jayco Seneca Owner’s Manual defines the “Structural Components” of its three-year structural warranty as follows:
Structure Components means materials and/or workmanship directly attributable to Jayco relating to the lamination of the fiberglass sidewall assembly, the lamination of the rear wall assembly, the lamination of the fiberglass front wall (wrap) assembly, sidewall/end wall/front and rear wall frame assembly (wood and aluminum), roof frame assembly (wood and aluminum), and floor frame assembly (wood and aluminum).
See, e.g., 2024 Jayco Seneca Owner’s Manual, at page 10. The manual then tries to clarify:
Structure Components specifically excludes front and rear fiberglass caps and any other cosmetic fiberglass attachments, sidewall metal (unless the root cause is the wall structure); exterior roof material (EPDM rubber, TPO, etc.); floor covering (carpet, linoleum, hardwood tile, etc.); all sidewall, end wall, front and rear wall, roof and floor attachments, and delamination caused by water intrusion from lack of required exterior seal maintenance or other maintenance.
Id. at page 10.
Are you confused yet? Doesn’t the Wing Wall involve the front wall assembly? Doesn’t the Wing Wall fix also involve the floor frame assembly of the overhead bunk area? And isn’t the Vertical Seam part of the side wall assembly? Maybe Jayco is trying to escape warranty responsibility because of the “fiberglass cap” exclusion, “other costmetic fiberglass attachments” exclusion, or the “attachment” exclusion? I really don’t know. Regardless, the scope of those exclusions is by no means clear. Shouldn’t any ambiguities be construed against the drafters of the warranties? For whatever reason, Jayco has made it clear that they believe the Wing Wall problem and Vertical Seam Separation problem are not covered by the three-year “structural” warranty.
I’ll leave it to the lawyers to sort this out.
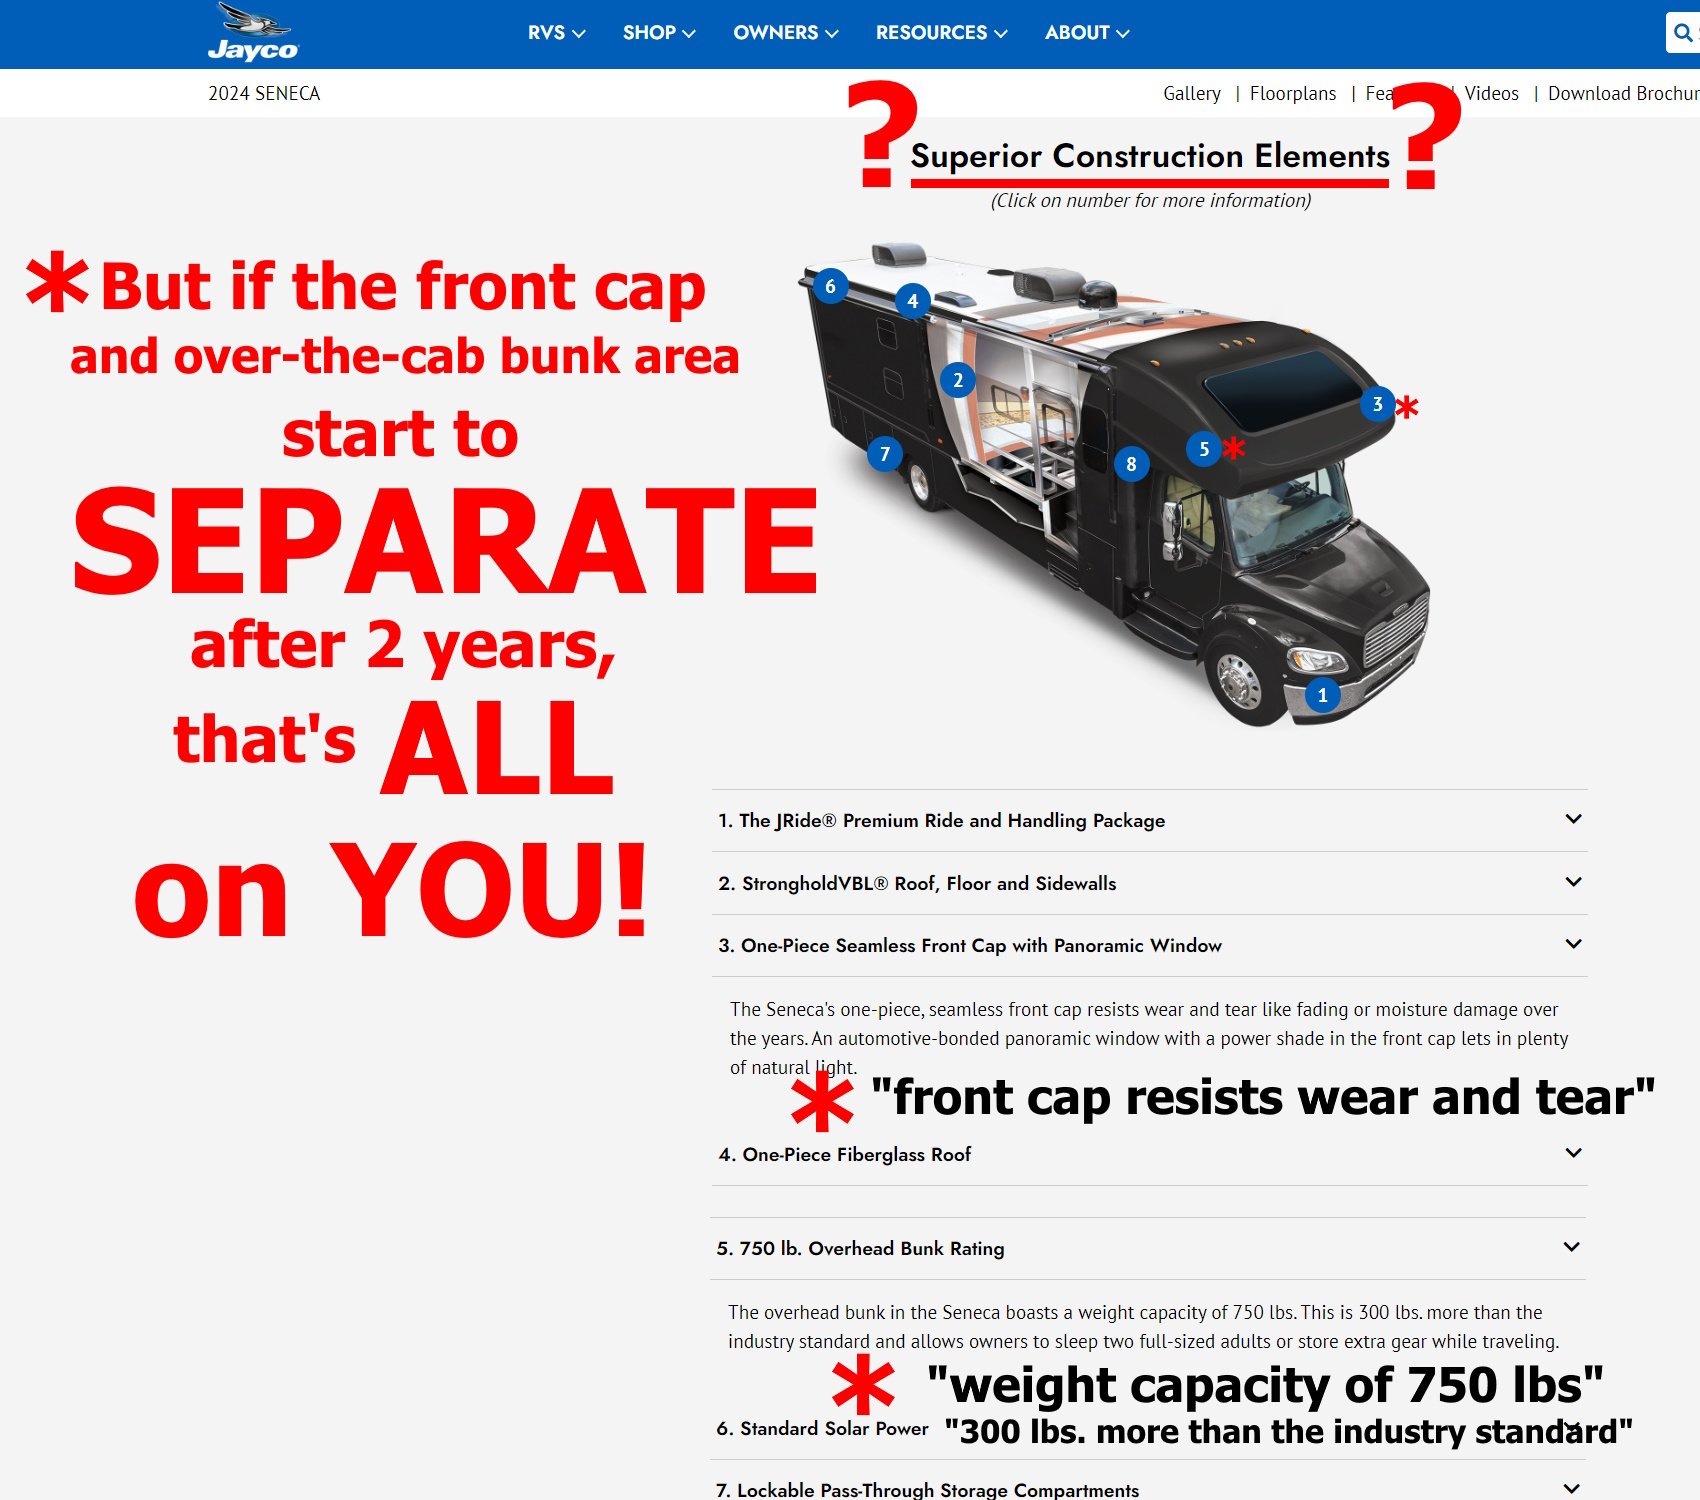
Jayco boasts about its 750 lb bunk capacity. However, but the overhead cap area of many Jayco Senecas have separated from the rest of the coach. Jayco will not cover those problems after the 2-year warranty period.
Personally, I think that to call something a “structural warranty” (even if “limited”) that does not cover the Wing Wall problem or the Vertical Seam Separation problem seems deceptive and misleading. For example, to sell consumers an RV where the living space (both the “box” and the over-the-cab bunk area) is not properly fastened to chassis cab itself (“excessive flexing, squeaking, or cracking at the transition between the cab and house”) seems to be inherently “structural.” To make matters worse, both Jayco and Entegra repeatedly boast that the overhead bunk capacity is 750 lbs (which apparently beats the industry standard by 300lbs). That’s all nice and good to hear in their promotional literature, but if the bunk area is properly fastened to the rest of the coach after a couple of years, that just seems like false advertising.
Of note, beginning in 2023, the Owner’s Manuals for Entegra Accolades contains this same limited structural warranty language. In the next section, I’ll briefly discuss the language in the Entegra Accolade Owner’s Manual prior to that time (2020-2022).
Scope of the Entegra Accolade “Structural” Warranty (2020-2022)
From 2020-2022, the Entegra Accolade / Accolade XL Owner’s Manual promised consumers a limited structural warranty, which mirrored that of the Entegra luxury Class A RVs (Aspire, Anthem, Cornerstone). The limited structural warranty covered:
(iv) only the steel or aluminum frame structure for the sidewalls (excluding slide outs), roof and rear and front walls.
See, e.g., 2022 Entegra Accolade / Accolade XL Owner’s Manual, at page 14. Entegra takes the position that the structual warranty basically only covers “metal welds.” Since the Wing Wall problem and Vertical Seam Separation problem do not involve a metal weld per se, Entegra believes these problems are not covered by the limited structural warranty.
Of note, the Entegra Accolade (2020-2022) limited structural warranty in the Owner’s Manual was different from the Jayco Seneca limited structural warranty in at least two other ways.

First, the Entegra Accolade limited structural warranty was applicable not just to the first retail purchaser, but also the the second retail owner of the motorhome. That’s right, the warranty was transferable to a second retail owner!
Second, the Entegra Accolade limited structural warranty was for FIVE years!
Despite the language in the Entegra Accolade Owner’s Manual (2020-2022), Entegra won’t honor that. Entegra takes the position that the expanded warranty (five year period / transferable to a second retail owner) is only for its luxury diesel models and does not cover the 2020-2022 Entegra Accolades.
Wait…What? Why in the heck is that expanded warranty language in the Entegra Accolade Owner’s Manual? How does the language magically get re-written by Entegra? Did consumers sign something at the time of purchase that told them that they cannot trust or rely on the Entegra Accolade Owner’s Manual? Even though anyone can STILL download the 2020-2022 Owner’s Manuals from the Entegra website, why hasn’t Entegra conspicuously informed anyone downloading the manuals that Entegra won’t honor the black-and-white structural warranty language at the time of download or on that website page? If this structural warranty language doesn’t apply, then which one does? The Jayco Limited Structural Warranty discussed above?
I’ll leave it to the lawyers to sort this out.
Personally, I think that to provide written warranty in an Owner’s Manual to consumers but then say “oh, we didn’t mean that” is deceptive and misleading.
Entegra updated the Owner’s Manuals in 2023, and as noted above, the Accolade warranty now appear to be the same as the Jayco 2+3 year limited warranty.
Final Thoughts
I’ll end this blog where I started, which it to say that we really like our rig. But…and there is always a “but,” right?….
BUT, I don’t like how Jayco and Entegra interpret their structural warranties. The lawyers can debate the legalities, but I think their stance is bad business. I think that people looking to purchase an Entegra Accolade or Jayco Seneca (new or used) need to better understand what they are getting into. The Wing Wall problem and the Vertical Seam Separation problem are known issues, but may not manifest themselves until after the two-year limited warranty is over. Based on what I’ve learned, neither Jayco nor Entegra seem to care. I’m hoping that the higher-ups at Jayco and Entegra reconsider how they’ve approached things and start doing things differently. We don’t expect RV manufacturers to be perfect, but when rigs that costs $250K+ repeatedly fail after a couple of years and the manufacturer won’t do something about it, something needs to change.
Jayco, you can do better.
Entegra, you can do better.
Until then….
Buyer beware.